Going Green Blog Background

Monday 27 August 2018

More Barge Painting


A pal saw the jug I had painted the other week and wanted one like it ..... so off she trotted to Wilkinson's and bought this green jug.    Slightly different design to the one I bought as it has an embossed butterfly on it.  I adjusted the design for the front and painted a similar design to mine on the back.


Hope she likes it!

Sunday 26 August 2018

Grandchildren's craft - Air Dry Clay


I had the grandchildren unexpectedly the other day for  couple of hours.   They had been shown how to make roses the previous day by a friend and wanted to show me what they had learned. Out came the air dry clay and some cutters as well, and this is the result of their efforts over a couple of hours.

 
I wasn't too sure about letting them loose with acrylic paints - so they used watercolour paints.   (I did prepare the round plaques with gesso for them, and the black canvas was a prepared black one.)


I gave them a few more hints on how to make the roses (what I call marzipan roses) which are just made by hand.   I think they did very well.

Saturday 25 August 2018

21st Birthday Card


I do find cards for men difficult - so it was Craft Artist to the rescue again.   I confess the first cad I designed was completely different with a cat theme (Bagpuss to be exact), as the recipient has recently got a little ginger kitten.   Then I realised it was his 21st birthday  - so a rethink was required.   He and his brother have both been keen sailors  - so I kept it simple.

Friday 24 August 2018

Paianted Stones


I decided to give a couple of my large stones a facelift, as they had been outside for a few years, and the paint had weathered.   Painted with Crystal Glitter paint, and then one stroke folk art painted using the paint fusion technique with acrylic paint, and then varnished.


Thursday 23 August 2018

Congratulations Card


My eldest granddaughter gets her GCSE results this morning.   I am keeping my fingers crossed that she has done well.    She has been quite poorly recently with an oral allergy syndrome. so I am hoping that her results will be what she wants.

Update:   Superb results - I knew she could do it!

Wednesday 22 August 2018

MDF Train - another sneaky picture of work in progress


Just another sneaky peak of work in progress.  This will also be for outside (for my son-in-law) so it has been given a coat of bronze powertex.


I am currently waiting inspiration as to how to paint it ... but I also have a few other work in progress items.   As this will be part of his christmas pressie - there is no pressure to complete it just yet!


Tuesday 21 August 2018

MDF Wishing Well


I had fun with this little project.  It was another of the Clevercut models.  Whilst I was putting it together, I applied a coat of Powertex, in the hope that it made it more weatherproof. (I did post a sneaky pic of that earlier)


a glimpse of the powertex undercoat - looks awful doesn't it before the painting!


As you will see I have taken a few photos in various locations, the one below is its final resting place (for the moment).

The well was overpainted with various acrylic paints, and the base and bucket had some ultra thick embossing powder applied randomly to give a weathered look.

The roof and the inner surround to the well were covered with air dry clay using some PME mats to create the texture - cobble stones for around the well, and stone wall for the roof.   Black paint was applied to the textured clay, and then immediately wiped back with a wet wipe.  (A fantastic technique learned from a demo by Kathryn Sturrock).   I also applied a little green paint and distress oxides to create a "moss" look, which also had some UTE powder added for texture.


Sunday 12 August 2018

Sneaky Peek


I am being a tease today ,,,,,, can you guess what this is going to be?    Well I can tell you it is another MDF kit.  I want it to be weatherproof, so I put some ivory Powertex on it as I was building it.

So keep an eye out for progress.

Saturday 11 August 2018

Art Journalling


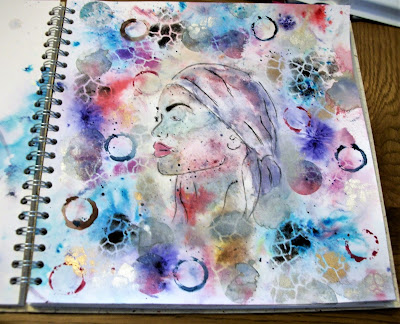
I am always intending to try some art journaling, but never seem to get around to it.   Well I rectified that today.   MY no2 granddaughter was with me for the day, and as she was busy playing on her x-box, I thought I would try out the new Peerless Designs "face" stencils that arrived in the post.  (I bought them because a) I am useless at drawing faces b) thought they might encourage me to play in my art journal and c) I thought the grandchildren might like using them.).

As it was raining, and I couldn't work outside or up in the Den, I thought I would stick to watercolour painting in the first instance - rather than acrylics, as slightly less messy as I was working on the dining table to keep my granddaughter company.  I also used some luscious powders, a sprinkle of brushos, some Izink ink pads, and a smidgen of starlight paint for the straight lines.   I also used some other stencils from my stash.

The picture on the right will be work in progress when I inspiration strikes me as to what I want to add.  Of course this is the great thing about art journals you can go back to them as and when you want and add more bits.

My granddaughter took a break from her video game and came to see what I was doing.  "Can I have a go please", she asked.  So here is her journal page.    (We were both working in the same journal, so I stopped working on my page for a bit.    I then did some later, and she also then did some more to hers.   She wanted to create an abstract look for hers - so it is quite different from mine.   She has fun with the luscious powders!


I confess I haven't quite got into the "grunge" look of creating pages - I will try though.  Confess I would never have thought of starting with a blue/grey face!

Whilst she was putting the finishing touches to her painting, I was trying to encourage her and tell her about the "Rule of Three" or at least odd numbers, and demonstrated on a little tag I had handy.  Here it is.


We certainly had a fun day - and I am getting ideas of what she might like for Christmas .... could get expensive!   I will keep my eye out for bargains on journals and ink pads etc.

Friday 10 August 2018

Beautiful Lily


Not crafting, but couldn't resist sharing this beautiful Lily.  I had no idea I had one like this - it was in the same pot as a Stargazer one.   It is enormous!

Thursday 9 August 2018

1st Birthday Card


I confess I forgot this birthday was due - it wasn't on the calendar!  (Obviously when my GGNiece was born I didn't write it on last years calendar.  Bad me - off to the naughty step!

A quick play on Craft Artist, and I rectified the situation - better late than never.  It is also on the calendar ready for transfer to next year.

Wednesday 8 August 2018

Canal Barge 2


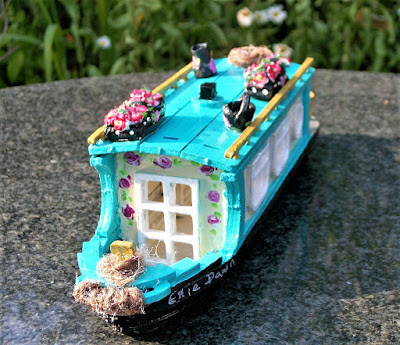
Here is the other barge - which I managed to finish this week.   Again just mainly photos, as basically self explanatory.


Was a bit cheeky and named it the "Lady Mags"  ...... well the barge is for me!   The "barge" painting isn't quite so good on this one as was trying to be a realistic like the jug I painted, but on a small scale, and trying to get a brush into do it was a tad taxing with my dodgy eyes.


Close up of the ornaments on the top - made from air dry clay as before.   This time I added a kettle - pretty pleased with how that turned out.


Tuesday 7 August 2018

Canal Barge 1


I suddenly realised that I hadn't posted the finished barges  Not a lot of explanation - I painted them with acrylic paints.  

I thought the best way was to just show a lot of views.


I will explain that the little ornaments on the top of the barge were made from FMM air dry clay, just using my fingers and a paintbrush to hollow out the bucket and jug.  The flower displays had some offcuts of scourer stuck in the top ( the rough side)  and then some little "stamp-plonker" flowers added.   They were all made in white clay, then painted.   The "rope" embellishments came with the kit.


It now has pride of place in my son-in-laws garden, and it is names after his wife and daughter.

Sunday 5 August 2018

Experimenting with techniques

front side

I purchased this little box the other week from Indigoblu, along with some stamps.  I also have a canvas apron to paint along with some similar canvas panels to paint and attach to it - so I thought it would be good practise to try the stamps etc out before I tackled the apron.

The idea was to start of with a crackle finish, but this didn't turn out quite right, so nothing ventured nothing gained, I proceeded to try and get a distressed effect using paints.

second side
 I wanted to experiment with rice paper.  I stamped onto the rice paper with versamark, and then adhered it to the box with slap-it-on.   I then painted the images.

third side
 I tried out a bit of stencil work with inks and texture paste.  The paint drips were done with texture paste, then painted and finally versamark and ultra thick embossing powder applied.

Fourth side

I applied versamark to the rose, after I had painted it and UTEE as with the paint drips.  I used the same technique on the bottles on the front panel.

The top
 The butterfly on the top was created with texture paste through a stencil.  When dry I replaced the stencil and painted various colours through it.   I then applied versamark through the stencil and added a few coats of UT embossing powder.

another view
I found a stencil in my stash with the word Art on it , which was just right for the front.   I used a dauber and a black ink pad.  I also used a "splodgy" stencil and ink on the ribbon.  (Wasn't sure if it would run or not - so sealed the ribbon with pva glue.

the inside

I painted the inside with Pebeo DYNA orange/yellow iridescent paint.  Not a colour I normally use, but perfect for the inside of the box and lid.   It also married up well with the ribbon from my stash.


and finally a close up of th lid showing the embossed relief butterfly.   I must admit it looks fantastic in real life, and the grey shadow around the edge doesn't appear quite so wide, but helps with the 3D effect.

Definitely an experimental piece using different paints, inks etc.

Saturday 4 August 2018

Folk Art Jug/Pitcher

Photo taken in the sun

I fell in love with this "jug" in Wilkos the other week    It just spoke to me and said "buy me".  I just knew it would look great with some painted decoration on it.

As you know if you follow me, I like the "paint fusion" style of folk art;  but I really wanted to get to grips with proper barge painting.  I purchased a little book explaining how to do it this week, so there was no excuse - in at the deep end so to speak.  Today was the day!

I didn't do a practise piece, having already known how to do the basic brush strokes - it was the roses I needed to learn and master.

same jug - photo taken in the shade.
(Hopefully showing detail more clearly)

I am really pleased with how it turned out for a first attempt.  It is quite a different technique to the paint fusion I normally do, albeit the brush strokes are basically the same.  Hopefully with practise I will get better.  However a friend really liked it and I have promised that if she buys a jug I will paint it for her!

PS:  I was really supposed to be finishing off painting an MDF barge that I built for myself.   (more of that anon  -  when I have got around to finishing it!)