Going Green Blog Background

Saturday 30 November 2013

Knotted Macramé Christmas Tree


My daughter posted a link to an idea from a Scouting website on facebook last night.  Well .... I had all this cord that I had bought in the Beader's Companion sale, and thought - oo must try that.
 
There were no instructions on the link, but a bit of googling came up with some instructions elsewhere!  The instructions were for all green trees, but I had to be a bit more adventurous and make a "pot" for the tree.  I have some brown cord too, so might try that at the bottom as a trunk.  Brain is now in overdrive, and I am thinking of trying different coloured trees - perhaps a white one?
 
It is 2" from top of loop to base - so would actually make some fun earrings.
 
Thanks for popping by.

Friday 29 November 2013

Tiny Topsy Fairy

Topsy - first end
 
Those of you that know me will know that I don't DO knitting!  It is not that I can't knit, I just don't enjoy it that much and it makes my arm ache and my hand cramp.  (Not the hand that is doing all the work, but the left hand which is doing nothing!)  However, I did enjoy making this little doll.
 
She is a little double ended Topsy-Turvy doll, and is only about 5 inches tall.  I have made her for my youngest granddaughter for Christmas, with oddments of wool in my stash.

Topsy - Fairy End.
 
She should theoretically have a feather duster in one hand in the first picture and a fairy wand in the second picture.  However, I decided that I would omit them, as I could see our 18 month old, getting them caught on her clothes as she changed from one end to the other, or pulling them off.  I have even put a little stitch in her ribbons, in the hope that they won't fall off and be lost!
 
If you would like to try making her yourself here is the link to the blog where I found it.   http://flutterbypatch.blogspot.co.uk/2010/11/tiny-topsy-tooth-fairy.html

Friday 22 November 2013

Wire Frangel (Fairy/Angel)

Finished Angel
 
At the beginning of the week I went on a Wire Fairy/Angel Course with my daughter and daughter-in-law,  run locally by MakeHorsham  (http://makehorsham.wordpress.com/).  Apparently on last year's workshop they decided to call them Frangels!  Therefore I have name my Angel Fran!
 
We had a lovely evening, even though for some reason I wasn't in the mood for being creative.  Non of us finished our angel that evening, and as I wasn't really happy with what I had done, I started her again almost from scratch.
 
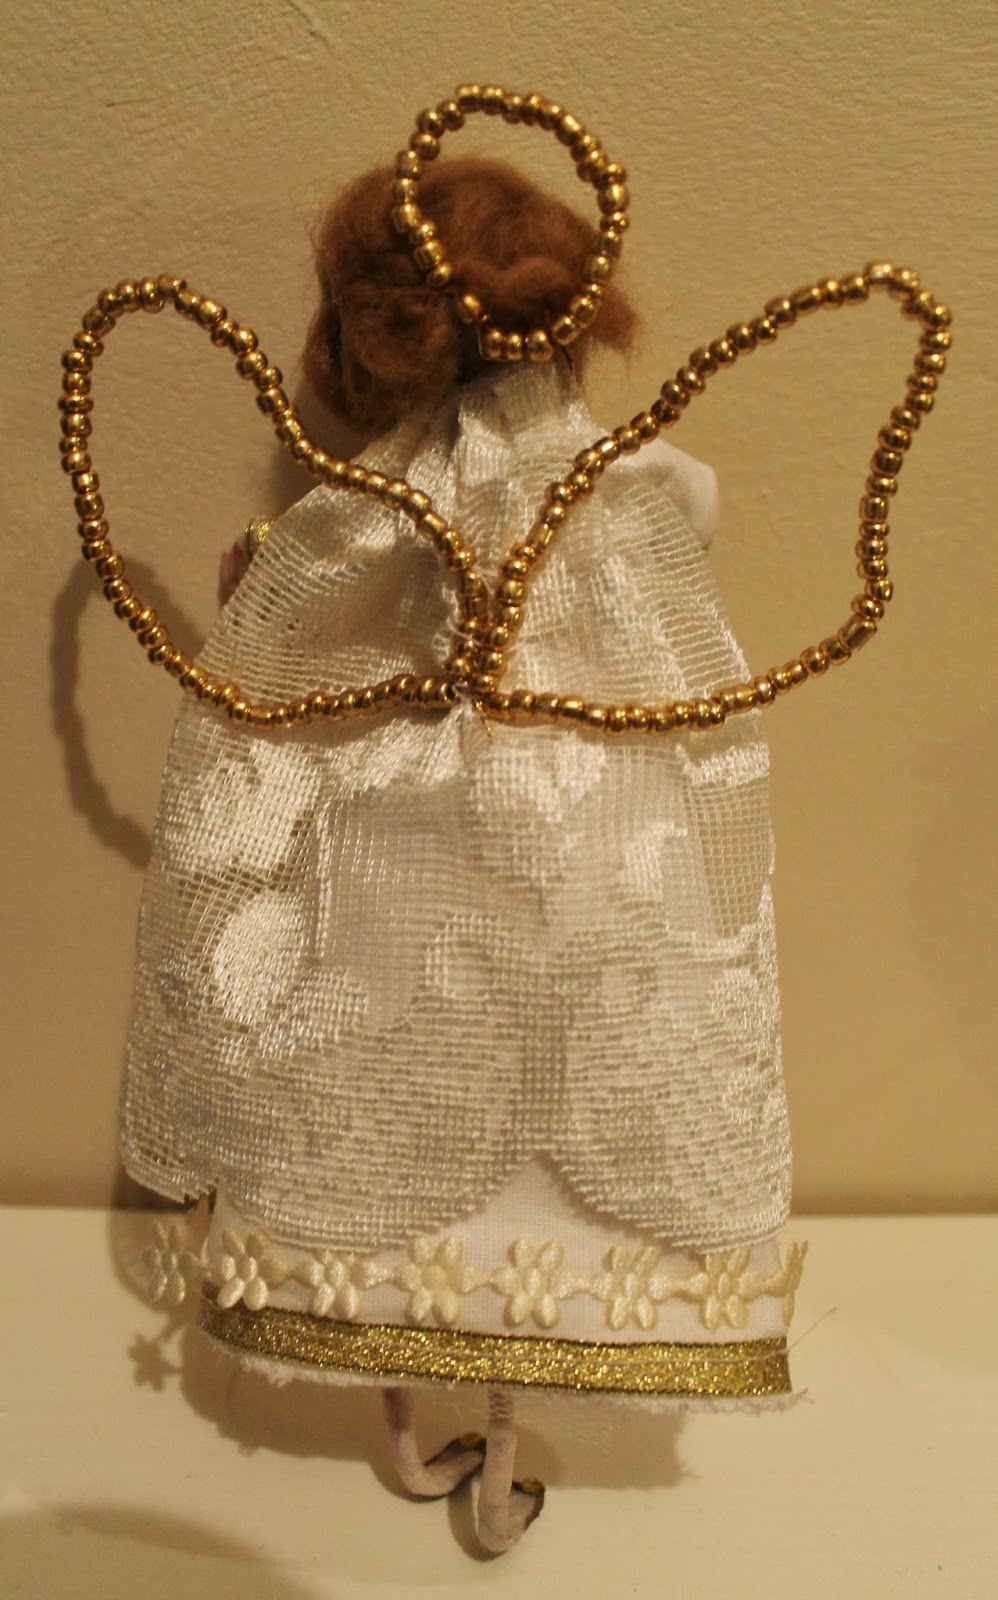
Originally we wound masking tape over the wires and the fleece that formed the body.   When I got home, I would some micropore tape over the top of the masking tape, and then using a dusting brush, gave it a bit of flesh colour with some pink chalks, as well as her face.
 
My original angel didn't have a very long dress, and the sleeves were made separately, so I redrew the pattern, incorporating some sleeves.  Being at home I had the use of my sewing machine, instead of hand-sewing everything, so before sewing up the dress I applied some gold ribbon.  However, I did hand-gather her net underskirt!
 
Her coat was made from some net curtain tie backs.
 
Her hair was shaped but needle-felting it to the cotton ball head, and some diamante and an ornate jewellery finding glued on to create a tiara.  I then glued on some daisy ribbon to her dress, and attached a chiffon ribbon bow.  Her shoes were created  with a gold promarker pen and a small diamante added.
 
Finally I took some jewellery wire and some large seed beads, and created a halo and some wings.  (I would have used smaller seed beads, but it was such a nightmare trying to thread them on the wire, that I swopped to the large ones!)
 
Hope you like her!


Back of Angel

 
I am half tempted to make some little choirboys to go with her - my mum and I used to make them many moons ago with table tennis ball heads and a cone of cardboard covered with felt  (it was probably a Blue Peter idea originally, but I can't remember!).

Finally - I created a Christmas Card from the top photo using CAP2.  I took her into cut-out studio and took out the background.  I then put her into a bauble, using a free snow globe kit from:
http://lowcountryscrapper.com/blog/
and the other elements were from a kit by:
 http://waterloproject.blogspot.co.uk/search/label/Advent%20Factory.  Do check them out.


Thanks for dropping by.

Monday 18 November 2013

Birthday Cards

A selection of cards for this weekend's birthdays, all created in CAP2.
 
From The Wrinkles cd


close up of Guardian Angel phone charm for Becca

Tuesday 12 November 2013

Ceramic Painting

 
During the half-term holiday we visited the Ceramic Shack, a little shop in town, and did some ceramic painting (another first for me).
 
I had great fun painting these two mugs (they actually have names on them, but are hidden at mo as they are Christmas presents).
 
I sponged the paint on for the backgrounds, and then painted the roses on the turquoise mug, adding a bit of detail to the petals, and also outlining in grey (as per lessons I have learned in paint fusion).
 
The red mug was kept fairly simple, and the swirls etc are made using shaped wire affixed to wooden "pencils" .   Think I will have to make some of these up for use with my paint fusioning!


I enjoyed it so much I am going to go back and do some more, and hopefully try some paint fusion techniques next time - now that I know what I am doing!


Monday 11 November 2013

Remembrance


As it is Remembrance Day today, I thought I would share a Memory Page I did in CAP2.  The background of this page is actually a drawing my father-in-law Ron did whilst in the Army.  I am not sure if it was when he was in Burma, it might have been when he was in Africa.
 
The soldier is a self-portrait and I note he only has lance-corporal stripes on his arm - later on in the war he was a Colour Sergeant, which is why I think it might have been earlier.  The "Steady" in the bottom corner refers to his Regiment "Steady The Buffs"!    My mother-in-law kept this picture in her dairy in her handbag always.
 
The photo on the left is of my husband's maternal grandfather who was killed in WW1.  We knew nothing much about Sydney and had no photos, but through my genealogy research I made contact with cousins in New Zealand, whose line we knew nothing about, and vice versa.  In their collection of photos was this one of Sydney, which he had sent to his sister!  The magic of the internet!
 
This I do know was written and sent from Burma and was kept with the drawing above.

and finally - my header for FB this weekend, which includes a photo of Sydney's grave in Flanders.
 

Sunday 10 November 2013

Chocolate Leather (Chocolate Modelling Paste) and Ganache


We had a chocolate demonstration at Sugarcraft Club last week, which inspired me to have a go at working with Ganache.   Surprisingly in all the years I have taught Cake Decorating I have never worked with Ganache, althoughI have worked with chocolate and love working with Chocolate leather.
 
So yesterday saw me having a little play, using the recipes that David Edward our demonstrator gave us.
 
I am quite chuffed with the results, as obviously I have never piped with Ganache either!  and as I don't really DO cupcakes, to be able to create something with the chocolate was really enjoyable.   I also learned a different way to pipe roses (the large roses in the picture), which in the past I have never been able to achieve.   (I have always piped roses using the nail part of the piping nail, but these large ones were piped on the flat part - actually my nail wasn't big enough for piping these - so I stuck a piece of waxed paper to the top of a pringles can and piped on that - lol!)
 
Some of the cakes have white chocolate leather under the roses/flowers, and one has dark leather under a white leather flower shape.
 
some of the family were visiting whilst I was piping the cakes, and they soon got demolished.  However, when they had gone I had a little play with some dusting/spraying of the cakes.  Here are some close ups:
white choc leather, impressed with patterned mat, and rose piped using way
I learned to pipe roses on the nail.

Choc ganache on cake, then piped ganache pansy with choc leather centre and dusted with silver

dark and white chocolate leather

piped ganache rose, dusted with gold (piped on pringles can)

ganache rose sprayed with pearlescent spray.
 
David let us sample various flavoured ganaches - so that is my next experiment - and I have sent away for some hazelnut paste and some pistachio paste.   Looks as though I shall be experimenting with the ganache for the insides of chocolates for Christmas!

Thursday 7 November 2013

Baking


The afternoon has been spent in the kitchen, and I have made 3 Christmas cakes.  These two are for my son's and daughter's families.  7" on left and 8" on right.  A third 9" one has just come out of the oven.  Needless to say there has been a lovely aroma wafting through the house!
 
For info they are not burnt - they are in fact very dark in colour as I use treacle and molasses sugar in the recipe.  They are in reality more the colour of the side of the one on the left.  The flash has made the tops look much lighter.
 
I don't mind that they have domed slightly as that means I have to level them, and we get to eat the trimmings before Christmas!  In fact I have done a first level of these two already.   (Well you have to check the taste/texture is ok don't you!  I can confirm that they have passed the taste test, both by me and the Man of the House!)  My cake which is the 9" one, hasn't domed so much, so  there will be little tasting of that!