I said on my last post, that I would share the journal covers that the other two grandchildren had made, and having been under the weather I forgot, so am rectifying that tonight:
Showing posts with label Katy Sue moulds. Show all posts
Wednesday, 18 December 2019
Sunday, 13 October 2019
Grandchildren's Art Journals
| 7 yr old |
I had a couple of the grandchildren for a sleepover, and they wanted to craft - so I let them have a couple of my art journals, and they created these covers for them. Didn't they do well.
| 10 yr old |
They gessoed the covers and then added Pebeo Violet/Blue DYNA paint. The created the embellishments with Hearty Air dry clay and Katy Sue Mould; which one painted with Posca pens, and they both applied Pebeo gilding wax to them. They then created dots using the Royal Talens Effect Liners/
Monday, 24 June 2019
Sunday, 23 June 2019
Another journal cover 1)
Another journal made the sane was as the one shown yesterday 0 slightly different colours, although still using my favourite blue/black for the background, I also used a little fairy mould from my stash on the shield..
Monday, 8 April 2019
"Hat-shaped" Box
I have been meaning to tackle this for a while, but couldn't decide exactly how I wanted to decorate it. I decided to go with a faux leather effect (Kraft card treated with glycerine and water and screwed up, and when dry I applied distress inks and distress oxides). The faux leather was cut up into small pieces and applied to the box with heavy duty gel both under and over it. When this was dry I highlighted all the "seams" with gold Nuvo drops.
I then applied random bits of screwed up tissue to the base with watered-down pva, to create a different "leather" effect. This was then painted with various shades of oxides, and distress inks and acrylic paint.
I then created a buckled hat band from Hearty clay and a Katy sue mould, which I then painted in various shades of brown and highlighted the buckle with gilding wax (but decided it didn't show up enough so made it more 3D with more gold Nuvo drops.
I painted a selection of MDF cogs and a "star" embellishment with Pentart Rusty Effect and Patina paints.
Finally the whole thing was sprayed with Spray and Shine.
| The faux leather effect |
| How it started off |
Wednesday, 3 April 2019
Unicorns rule
I love this mould from Katy Sue, which was created using Hearty Soft Air Dry clay. I mounted it on some green/brown pearlescent card from my stash. I was tempted to leave it just as a Cameo, but as it was for one of my granddaughters who loves Unicorns, I thought I had better add her name to the front of the card. I used some Crafters Companion dies for this.
The insert also had a picture of a Unicorn on it with a sentiment that said "Always believe in Unicorns"
Wednesday, 6 March 2019
"Wicker" Trug/Basket
I wasn't quite sure how I wanted to decorate this little basket shape. I then had the idea of trying to make it look like wicker basket. I decided to use a technique used in cake decorating of a basket weave. Now in cake decorating this is done with icing and a nozzle. Erm maybe not a good idea to use a nozzle and ruin it - so I experimented with Golden Fiber Paste and a fork. (I think it has worked!)
It was then painted with Pebeo Yellow Ochre and when dry overbrushed with Pebeo Dyna Irredescent Precious Gold.
The centre handle and the insides were painted with various shades of brown, yellow and cream colours to create a wood effect.
I was originally going to decorate it with some flowers, but had the idea of making some straps as "hinges" for the lids. I created these from Hearty Soft air dry clay and used the Katy Sue strap mould painted in various browns and the metal parts highlighted with Pebeo Guiding Wax
The centre handle and the insides were painted with various shades of brown, yellow and cream colours to create a wood effect.
I was originally going to decorate it with some flowers, but had the idea of making some straps as "hinges" for the lids. I created these from Hearty Soft air dry clay and used the Katy Sue strap mould painted in various browns and the metal parts highlighted with Pebeo Guiding Wax
| The top |
a couple more views
Friday, 8 February 2019
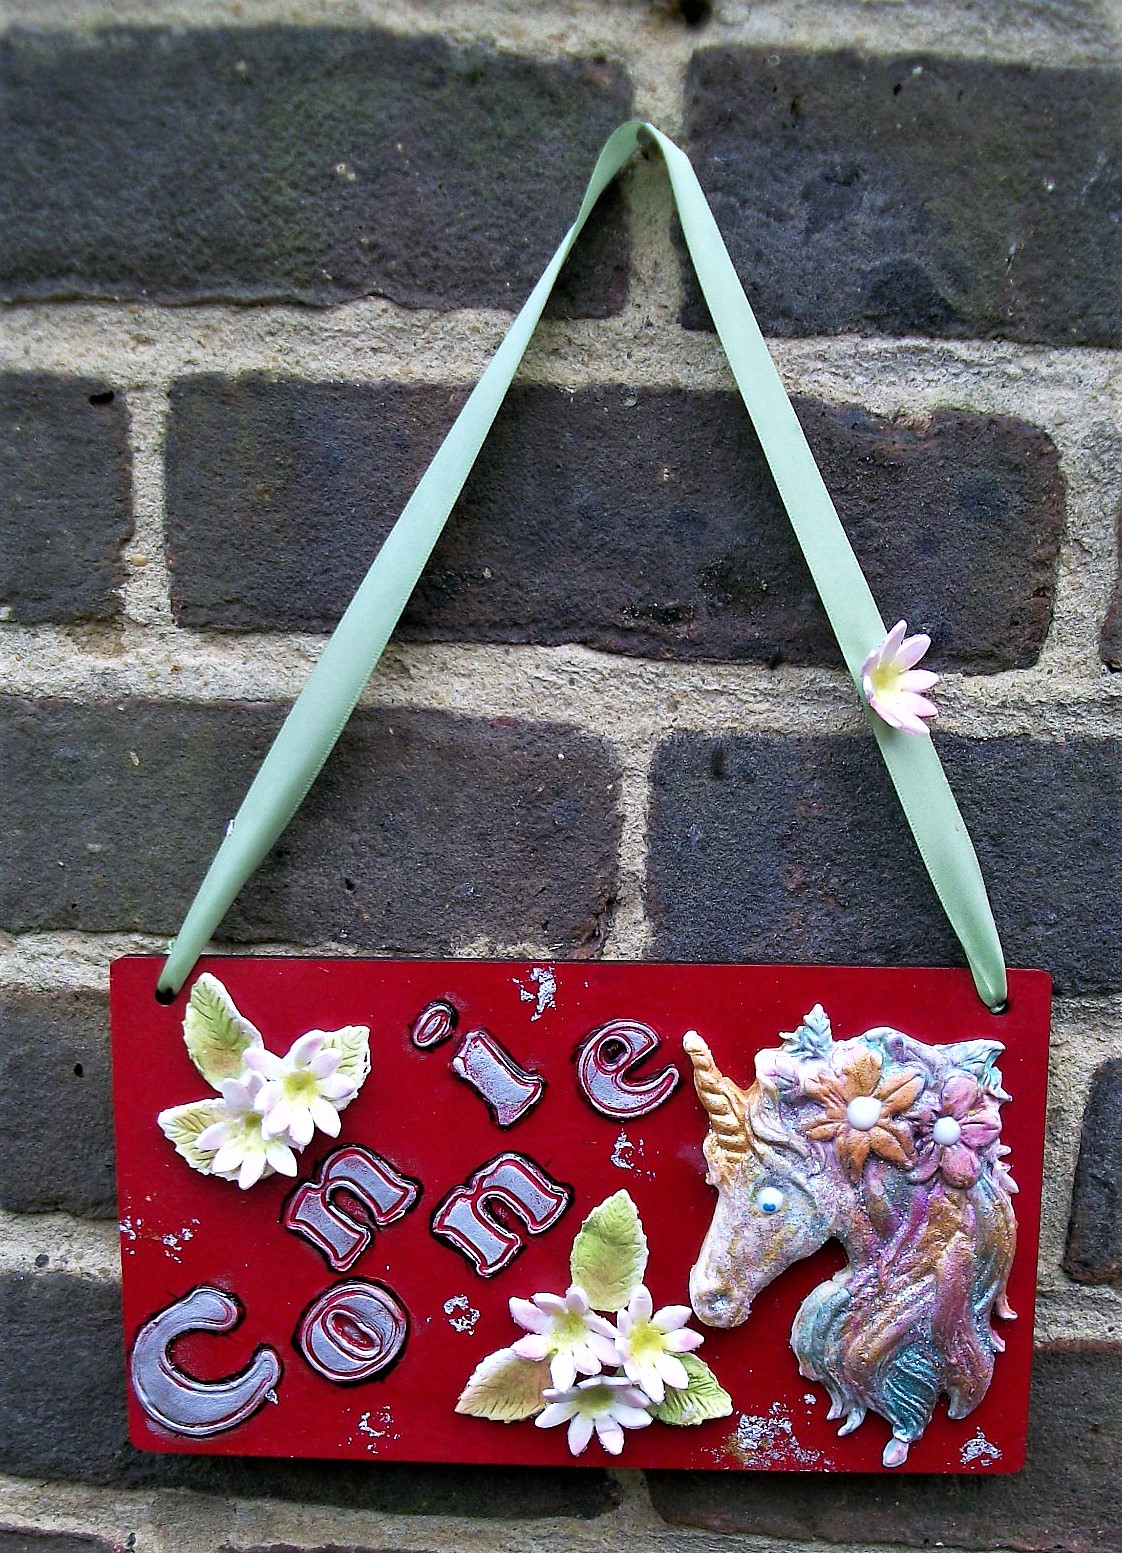
Unicorn Plaque
Babysitting for me again today with poorly 9 year old off school ..... So Nanny's stash was raided!
The Hearty Soft clay came out again with a Katy Sue Unicorn mould. I also found my plunge letter cutter, and the plunge flower and leaf cutters for her.
She cut out the letters and made the unicorn and whilst the unicorn was drying off slightly we worked out how the letters would fit .... (not in a straight line - so she compromised with offset letters). The letters were stuck on and they and the background were coated coated with red Amsterdam acrylic paint. Whilst that was drying she set too to paint the unicorn with Luscious powder - absolutely perfect for unicorns, particularly with some unicorn sparkles added to the "face". Some Nuvo drops were added to the centre of the flowers.
Whilst waiting for paint to dry she made some flowers and leaves, and then dusted them with cake decorating petal dusts, deciding paint would be too "heavy" for them.
She was then able to stick rub some silver Pebeo gilding wax over the letters and run a black Posca pen around the outside as she wanted them to stand out. (She beat me to it with this suggestion - getting the hang of this arty lark - lol!). She then stuck the flowers and unicorn on, and added a few random drops of Flitter Glue and some silver metal flakes.
When she was finished I sprayed the whole thing with Spray and Shine, which really brought out the red of the background. I also added some ribbon for her. (I love the way that she had a flower left over and stuck it on the ribbon.)
| another view taken inside |
We could't decide how to take a photograph - so we took one outside, and then one inside.
She was really pleased with her effort, and got the message with colouring that less is more, and you can add colour more easily than taking it away. I think this is one of the best pieces she has produced. (one on one obviously pays off). She did make me smile though - she said "I can't believe that a few hours ago this was just a plain piece of brown MDF"! (RESULT ! - we'll make a craft ot her yet!)
Thursday, 7 February 2019
I had my youngest granddaughter (6) to stay overnight the other day, and having seen my new moulds she wanted to play!
She wanted to make a fairy door (and wanted it to be partially open so she could put notes behind the door (no pressure then!). This was all her own work (with a little help from me in cutting the shape of the door). Using Hearty Soft Air dry clay, she put bark effect on the circular mdf plaque and painted it with various shades of brown and cream acrylics, and I taught her how to dry brush. She then painted the door which was created using the dragons skin mould, using Amethyst Starlight paint and dry brushed with gold - she got the hang of dry brushing very quickly. She then made some hinges from another Katy Sue mould and created a door knob - these had Pebeo gilding wax applied, and she soon learned the technique of applying the wax with her ring finger.
We couldn't find my Katy Sue moulds for the leaves, so we found some cutters for to create the rose and ivy leaves, which she dusted with cake decorating dusts.
Finally she discovered y stash of feathers and created a flower with them and a piece of clay, painting the centre yellow and adding a crystal gem to the middle as well a adding a gem to the door for a "peep hole".
We had a little trouble adding string to the plaque, so we compromised and she chose some matching embroidery thread for the hanger.
I know I am biased, but I think this was excellent. She was thrilled with it, and she is certainly a quick learner and a promising little crafter - she knows what she wants and as an "artistic eye".
We couldn't find my Katy Sue moulds for the leaves, so we found some cutters for to create the rose and ivy leaves, which she dusted with cake decorating dusts.
Finally she discovered y stash of feathers and created a flower with them and a piece of clay, painting the centre yellow and adding a crystal gem to the middle as well a adding a gem to the door for a "peep hole".
We had a little trouble adding string to the plaque, so we compromised and she chose some matching embroidery thread for the hanger.
I know I am biased, but I think this was excellent. She was thrilled with it, and she is certainly a quick learner and a promising little crafter - she knows what she wants and as an "artistic eye".
Wednesday, 6 February 2019
Dragon's Eye
I had to play with the new Katy Sue Fantasy design moulds. I just love the dragon's eye, dragon's skin and claw moulds. I also used the belt and buckle moulds, and elements from the hinges mould.
I used an MDF cheese board blank for the background, which I painted with black gesso and then my favourite Pebeo Blue/black paint. All the elements were created using Hearty Air Dry clay.
The dragon's skin, eye and claws were painted with Starlight paints. The belt and buckle elements were painted with Amsterdam and Pebeo acrylics and then a touch of Pebeo gilding wax was applied. The little screw heads were painted with gold Starlight paints and then gilding wax applied.
I used an MDF cheese board blank for the background, which I painted with black gesso and then my favourite Pebeo Blue/black paint. All the elements were created using Hearty Air Dry clay.
The dragon's skin, eye and claws were painted with Starlight paints. The belt and buckle elements were painted with Amsterdam and Pebeo acrylics and then a touch of Pebeo gilding wax was applied. The little screw heads were painted with gold Starlight paints and then gilding wax applied.
The leaves were painted with a mixture of Amsterdam, Pebeo and Starlight paints and then a few bits of IndigoBlu copper kettle mega flakes adhered to them and a smidgen of gilding wax again.
Finally a strip of card was stamped with the word Imagination and a touch of gilding wax applied around the edge, and gilding wax applied to the edge of the board, and the whole thing sprayed with Spray and Shine to seal it.
Sunday, 16 December 2018
Christmas Sugarpaste Cake 2
and finally a simply unwired poinsettia using the Flower pro moulds for centres and veining, having used cutters from my stash for the bracts and leaves.
Below is all three cakes made this year.
Friday, 14 December 2018
Sugarpaste Christmas Cake 1
Using the Katy Su bark mould again, and the trio of cute owls moulds. Fern using the Flower Pro fern mould, and as before Christmas roses veined with Flower Pro mould
| side view |
Wednesday, 12 December 2018
Royal Iced Christmas Cake
| top view |
I have to confess I was really pleased with how this turned out. I love the finish of royal icing. It maybe a bit of a faff, as it takes a few days to get a perfect finish. I iced the top in the morning,and then the side in the evening. This was repeated twice more on two more days, finishing off with a watered-down coat on the top. (The side didn't need it so skipped doing the thin coat on that!)
The topper was made from sugarpaste, using a couple of moulds fromKaty Sue for the bark and the owl, which I then painted with edible dusts. The roses and holly etc were made from cutters in my craft stash, and veined with the new Flower Pro rose and leaf veiners. These were made from flower paste.
| side view |
Monday, 10 December 2018
Another Sneaky peek
Another quick sneaky peek - - I still have to do finish decorating the sides of this one and the one I shared yesterday - but need to go and buy some ribbon.
For this one I used the owl mould and bark mould from KatySue, and used the Flower Pro rose veinger for the Christmas roses.and also the Flower Pro fern mould.
I have done another topper, but as that is for a royal iced cake, it is currently sitting on a silver board, and too difficult to take a photo. It will be a few days as Royal Icing of a cake takes a few days!
However, once all the cakes are finished I will show you the finished results.
I have done another topper, but as that is for a royal iced cake, it is currently sitting on a silver board, and too difficult to take a photo. It will be a few days as Royal Icing of a cake takes a few days!
However, once all the cakes are finished I will show you the finished results.
Friday, 28 September 2018
Writing Slope Project
Along with the hanging planks, I have been working on this little project over the past couple of days, and must admit I am pretty pleased with it, albeit the photo doesn't really do it justice as it was the wrong time of day to take a photo really.
.
It started off like this - painted with Crystal Glitter Antique White Glitter Chalk Furniture paint, mixed with Luscious Powders - Mermaid Tresses for the top and inside, Unicron Dreams for the sides, and a smidgen of Penny Dreadful for the escutcheon (ooo get me I remembered the right word!).
I then added some decoupage with 13@rts multi-purpose gel medium, and then did a coat of the medium all over and inside the slope.
I then made some roses and leaves from FMM air dry clay. It's a while since I made roses properly, normally for clay work I make what I call Marzipan roses - i.e. freehand with no cutters. However today I used a cutter and Nick Lodge/Katy Sue silicone moulds and mats. (Am a bit rusty, and my dusting needs brushing up on - pun not intended - another time I will colour the clay first!)
| one of the roses |
| Finished spray of roses, rose leaves and fern. |
I also added some spray granite to the sides, and a little gilding wax to the escutcheon.
| granikte spray |
Subscribe to:
Posts (Atom)