Going Green Blog Background

Showing posts with label Sheen Douglass - Paint Fusion. Show all posts

Sunday, 27 May 2012

Lilac

First attempt at Lilac

I have been feeling a lot better over the past few days, and manged two meals out - one with my husband on Friday, and a lovely meal at the local "Smith and Weston" grill (Yee-ha) for my No2 granddaughter's 6th Birthday with all my family plus her aunt, her other grandmother and her partner.  She had her "kiddies" party today and I will share the picture of the cake her mum made later in the week (the one I should have made) - she made a fantastic job of it!

Today I decided to sit in the sunshine and get out the paint fusion bits and bobs and get re-acquainted with my paints!

To get back into the swing, I decided to try out Lilac for the first time.  Just painted on 160gsm card for the practise.  Quite pleased with the result, and the actual picture is quite effective in real life, as I used purple metallic paint mixed with the white for the petals.

I then did some prep for hopefully tomorrow's projects - some crackle finish on some little pots and a tissue holder (nutmeg brown on first coast and an almond shade on the top coat - I forget the exact names, without jumping up from here and looking at the tester pots!)
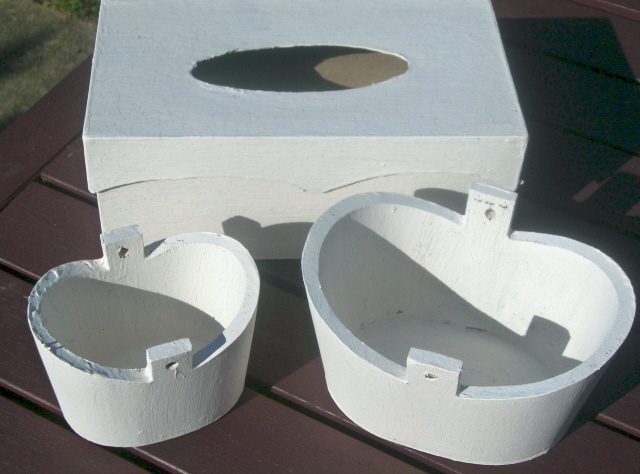


Crackle finished projects - the "before"


When they are finished will post some "after" pictures!

Mags

Saturday, 27 August 2011

Sunny Afternoon Painting

Well we had some sun again today - so I spent the afternoon trying to get ahead with some painting, of some of my Crafty Croc products.   Apart from the following bits, I painted the backgrounds of another 18 coasters ready to "fusion" for Christmas presents.  My poor brain was very confused working on Christmas gifts and Easter samples at the same time - but no doubt those that know me will say "What's new - you are in a perpetually confused state"  - LOL!


A Wooden egg painted with pearlised green acrylic and a painted Daffodil/Narcissus.  (Trying to get ahead with my samples for the Easter catalogue!)


Three egg cups for my granddaughters for Christmas (they do have their initials on, but have hidden that side so they can't guess who is going to get which one!)


A pencil holder - I like the finish of the gold pearlised paint.


and finally, I touched up the topper I painted of the Fir Tree - painted in some shadows and grounded the tree and added some snow - am happier with it now.

Thanks for popping by.

Mags

Thursday, 25 August 2011

If at first you don't succeed ......

....   Share your failures with friends anyway!


At last the second set of my new Sheena Christmas stamps arrived today - Needless to say I had to have a play. Bravely I decided to tackle some more ceramic painting.  I was good and got an old tile out, and firstly sorted all the colours in the box and then tried them out on the old tile, as a reference!  I then tackled this bowl - ok so perhaps I should have found something flatter to start with and not curved - trust me to tackle the most difficult thing!


The Christmas Rose wasn't too bad, but the leaves were naff!


then I painted the other side - Ivy wasn't too bad - better than it looks in photo, and even the Poinsettia looked better in real life, BUT there is one good thing about ceramic paints that have to be set in the oven - until that is done they aren't permanent - SO ..... this is now all scrubbed off and bowl put in dishwasher ready to start all over again!


Having failed miserably at the ceramic painting - I then set to and tried my hand with the Christmas stamps and some acrylic paint!  I was going to paint the Christmas tree, and fir cone etc, but  decided that perhaps I would try out one of Sheena's suggestions and use the fir tree sprigs as a background for the Christmas Rose .  It didn't turn out to badly - so perhaps I had better stick to acrylics for a while!   (No I shan't giveup on the ceramic paint - I am just going to approach the painting from a different angle/technique - I will overcome !)

Mags

Wednesday, 17 August 2011

Craft Day with Granddaughter! Part 1

I had my eldest granddaughter for the Day today, and quote from her "I like coming here - you are fun".  This first part is our Paint Fusion session.


This was my main project today - a clock.  Ellie has "bagged" it as a Christmas present from me for her bedroom!   The background and the rim are painted with metallic acrylic paint.


Ellie came armed with this little box to paint and a coaster.   This is her first attempt at a rose.   She didn't want to try a free-hand "Stephanie Weightman one, so she stamped the open rose from Sheena Douglass, and then I persuaded her to have a bash at doing the centre.   Result - she can now paint roses.  Didn't she do well - she is only 9!  I then helped her edge the box with a gold pen.


Inside of the box, which I confess I painted for her with a little freehand rose and leaves.


This was her first project today - a little coaster in metallic acrylic paint.  It's actually more purple and silver in real life.


I had bought this pencil box from Crafty Crocs for her to paint.  Having mastered the rose on her little box, she then did the Daisy and the two roses on the side of her box.  No doubt another day will see her doing more on the other sides.


Ellie preparing the paint ready to do the roses.


and finally in this part - my second project - work in progess.  This side is metallic blue, and the reverse metallic green.   I shall probably add some Ivy to this side when my new stamps arrive.   Haven't decided yet what to paint on the reverse.   Daisies. Roses or Clematis - decisions, decisions!

All in all a FAB day - and if you want to know where we purchased the bits to paint - google Crafty Crocodiles.

Sunday, 10 July 2011

Revamped - work in progress!


I had a little time to play with my paints this afternoon.  My daughter had asked to borrow my old paint stripper, and this was the stand that my Dad made for me, many many years ago.   This was before we had posh lightweight heat guns for our embossing and we had to use a paint stripper!  They got very hot so you needed something safe to rest it in.  So for the past 20 years it has been just plain plywood.

I decided that I would revamp it.  I painted it with ivory emulsion and did the wet on wet painting technique, using some gold pearlised acrylic paint, to give it a sort of distressed look. Then used Sheena Douglas's Paint Fusion stamps - leaves from the Blackberry set and the Open Rose stamps, which I converted to full roses, using Stephanie Weightman's Rose technique.  The rose buds and gypsophila were free-hand!

so this is the first side done - now to decide what to put on the other three surfaces.  I am definitely hooked now on Folk Painting!


another view

Thursday, 30 June 2011

Recycling plus Poppy Candle

Gosh I have been so busy lately - but at last the samples have been packed and shipped, and have had a bit of "me" time, although not as much as I would like - so much going on at mo.

I received an order from Crafty Crocodiles this week, and couldn't wait to play with one of the bits in the parcel - some pearlised acrylic paints - woohoo!  A few weeks ago I came to the end of a very large tin of cocoa and thought that it might be useful for all the paintbrushes I suddenly seem to have acquired, so put it to one side - so a little recycling!

It is not brilliant - but as it is only for me and it was a first attempt at painting a spray of roses - I am quite happy with it and you have to practise on something!  Also painting without a safety net as such - i.e. freehand (no stamped imaged for guidance!)


front - painted with my new pearlised acrylics - inspired by Stephanie Weightman's one stroke painting technique.


the otherside with an attempt at honeysuckle using ordinary arcylics (copied from my folk painting book)


another view

I also painted another candle - this time with a poppy on two sides using Sheena's poppy stamp.  I confess that although I was watching Sheena's video - initially I got the order of the colours wrong - I have to remember to reverse what I am seeing on the video.  I was also listening to her saying paint the centre green and then highlight with black and yellow - duh this here dipstick having layed the colours out - promptly painted black centre first - so had to highlight with green and yellow - must be a moment when brain doesn't connect with hands!  (CRAFT = Can't Remember A Flippin Thing !)

front


back


right I am off to look for other things to paint and recycle ! ..................


Wednesday, 15 June 2011

Painted Candle


and to go with the card for my neighbour, I painted this today - my first painted candle!

Saturday, 12 March 2011

Another attempt at Icing Fusion!

Having worked my socks off in the garden this afternoon I decided to have another play today.  Whilst at a sugarcraft exhibition yesterday I came across some un-inked stamp pads for use with liquid cake colouring.  I dithered about getting one as they were £5 and obviously you could only use one colour on them!  I then forgot to go back to the stand and buy one!   However, googling for un-inked stamp pads I came across a tip for making your own with cut and dry foam! ..........   well I have some of that and thought ooo - can just cut a small piece for the colours I want to use!


So I decided to try out the Cherry Blossom today - I stamped the branch with brown liquid icing - it wasn't a perfect image - so I filled in some of the gaps with a brown food pen.   I then added the dots of pink and white royal icing and scribbled them together with a cocktail stick!  I still haven't got the consistency of the icing quite right yet!  However, I am pleased that I have learned how to stamp on icing now! - so count a day lost you don't learn something!

I am just going to have to save up for the proper paints - unfortunately the craft pot is going to be diminished by a fixed penalty notice I received yesterday whilst at the Exhibition!   Bit miffed about it - as the car park attendant had shown me where to park as there were no spaces left in the car park, but said he had been told to let disabled drivers park on the double yellow lines!    I parked carefully well up against a wall to make sure the car was well tucked in  (displaying my disabled permit) - as further up the road past a sign that said "no cars or motorbikes except for access" cars had parked on both sides of the road (no yellow lines - and yes they all got tickets too!)   My notice said it was because I was double parked - well I wasn't when I left the car and wasn't when I returned to the car - it would appear that somebody parked opposite me during that time thus causing me to get a ticket!    I was more than a little miffed to say the least, as I had made every effort to park tidily and legally - the car park chappie had originally wanted me to park further up and I refused!   It rather spoilt a nice day out!   I have appealed - so shall await the outcome - if it is not rescinded £30 of my craft cash will be going on the fine!