Going Green Blog Background

Showing posts with label Sheena Douglas - Paint Fusion. Show all posts

Saturday, 17 September 2016

Tissue Box


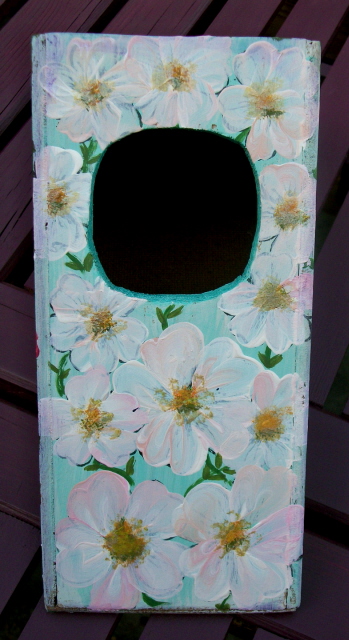
I have had this box prepared with the blue grey background since the end of last year!   Oops!  At last I have got around to finishing it off.  Mainly because I didn't know exactly what I wanted to do with it.  I had in my mind to do some "folk art" on it,

As you can see I decided on slightly more traditional style of paint fusion.  I used my new anemone stamp and leaf again - stamping in white to give me a vague outline to work to,  I outlined the aperture with Pebeo Silver marker.  (another new favourite)

another view

Saturday, 29 June 2013

Slate Heart and playing with my new toy!


I saw this slate heart in The Works yesterday whilst stocking up on some canvasses - well it would be rude not to buy it wouldn't it.  So whilst my daughter was painting her Paverpol owl canvas, and my eldest granddaughter was painting a door hanger and a pencil container, I managed to get this painted whilst we played in My Den.
 
I used Sheena's paint fusion daisy stamp, and then did some freehand leaves and the roses.  When finished it had a quick coat of Crafter's Companion spray and shine.
 
I think I need to nip to town tomorrow and see if they have any left and buy them up!
 
............
 
 
AND to show how varied my day has been, I got to play with my new toy - a new computerised sewing machine.  I haven't used one in earnest for some years - gone are the days before I was married when I made all my own clothes.  In those days would meet friends and my husband on a Saturday lunchtime - (although obviously he was only my boyfriend then) - and we would decide where we were going to go in the evening, and I would nip across to the local material shop, buy some material and catch the 3 pm train home, and by 8pm I would have a new dress made, ready to go out on the town!  Those were the days!  
 
I have only bought a new machine, as my old machine - a 21st Birthday present has failed to proceed - such a shame as it did a lot of the fancy stitches this one did and was top of the range in its day - and probably cost a lot more than this one at the time!
 
I didn't actually make anything, but played about with learning how to use it and tried a few of the fancy stitches:
 
practising!
 
now comes the decision ....... what to make!

Sunday, 27 January 2013

A Little Bit Sketchy meets Fantasy Paint Fusion

Inspired by Sheena Douglas's new stamp range which I received this week, I created this card from my daughter.


Finished Card

The background was stamped on beige pearlescent card using the Always Floral stamps, and the leaves coloured in with black Promarkers and then over-painted with a turquoise H20 and some white mica powder for highlights.  The flowers were from the same set and the small ones were treated the same as the leaves, but the large one was outlined with antique lead liner, and then painted with a blue Pebeo fantasy paint, and cut out when dry.  Some matching gems were then added.

The topper was then matted on to black pearlescent card and the basic card stock was white pearlescent card.

For the sentiment I worked out the size I wanted and created most of it (words and flourishes) using CAP2,  and once it was printed off I stamped the little flowers from the Always Floral set in London Fog, and then "distressed" it with a turquoise from my Big and Juicy Mountain Meadow, using an ink blending brush, and edged it with Black Promarker, before matting onto some more Black pearlescent card.

I hope my daughter likes it - the flowers are her favourite colour! 


Work in Progress


For those of you that know my usual style of card, this is something quite different for me !!!!! - but I have to thank Sheena for the inspiration.  I can see me using these stamps on normal paint fusion type projects, as the leaf spray is really useful.  I can also see me using them with the Pebeo paints.  It's not often I do a lot of stamping, but I know what I like and I could see the versatility of these stamps.

Thanks for popping by.


Mags

Friday, 16 September 2011

Painting again!

Well it was another sunny day today, and I just had to take advantage of it and do some more painting out in the garden.

I managed to get all the coasters varnished - they look great.  I have tried various varnish/sealant mediums for acrylics, and I must say the one from Crafty Crocodiles gets my vote, it is a lovely consistency, touch dry in less than 30 mins.  Yes I know I do samples for them, but their acrylic satin varnish is really fantastic, and really brings out the colours, and as it is water based, it washes out of the brush very easily.   It says it is weather resistant, so think I shall be sealing my painting with it when I paint my hanging baskets.  Here is a link if you are interested:

http://www.craftycrocodiles.co.uk/crafting-pens-c30/acrylic-satin-varnish-p272  I used their one stroke wash brush to apply it - lovely coverage - glad I invested in it!

Right that is the end of the useful information - back to what I achieved today!

Artificial Candle


This is a candle I bought in the Pound Shop - it is an imitation one which takes batteries, so thought I would "give it a whirl" as the saying goes. According to the wrapper it is supposed to have a vanilla fragrance! What will they think of next?   The Holly leaves stamp was one of Sheena Douglass's Paint Fusion Christmas Stamps.  Not sure I have done justice to the holly - looks more like oak leaves to me!  More practise need on holly leaves!

Shade of Grey Candle


This was an experiment using shades of grey on a small candle I bought from Sainsbury's - completely freehand painting on this one.


Ball-shaped candle


Another candle using Sheena's Christmas stamps.  Although I forgot there was a stamp for the fircones, and did those freehand!   Not sure where I got the candle - think it was Sainsbury's again.  That's the trouble with sneaking stuff into the trolley with the food shopping!


Ceramic Candle holder

I couldn't get a very good photo of this candle holder, which has pink and white free-hand roses and leaves on it with pale blue sprays of dots.   This was an unvarnished candle holder, and I used the Crafty Crocs varnish on it to seal it.   I think I bought the holder in Wilkinsons, don't think it was the Pound Shop.


Side 2 of Fan


and finally I painted the reverse side of a fan that I started back in August.  I had been putting it off, as it was a bit of a nightmare to paint with all the folds - but it has turned out quite well.   The background is blue pearlescent acrylic from Craft Crocs, and the roses are white and pink pearlescent paint (the pink is a Docrafts one I bought at the Glitter Pot recently.   You may recall the other side of the fan that I painted ......


Side 1 of Fan - Paint Fusion Poppies on pearlised turquoise that I created mixing paints

I hope you have enjoyed my little selection.  Thanks for looking.

Mags

Thursday, 8 September 2011

Bit chuffed today! - Updated

As some of you know I have been playing with various products from Crafty Crocodiles for samples for their catalogues. Well I haven't seen the latest hard copy Autumn catalogue yet so don't know exactly which of my samples have been included, but browsing their website I found one of my samples shown!

http://www.craftycrocodiles.co.uk/fun-with-wood-c17/wooden-wardrobe-style-jewellery-box-p26


To say I am a little chuffed is an understatement. I had so much fun painting this. It was crackle finished to start with, and then because of the small scale I stamped the rose and leaves using a couple of Joanna Sheen's pressed flower stamps for the doors as a guide for the painting. The drawer was painted using one of Sheena Douglass's techniques for quick roses.


Mags


Update: New catalogue arrived this morning - have been playing "Spot which samples I made" whilst drinking my coffee! ;-)

Sunday, 24 July 2011

Paint Fusion fun & 70th Birthday lunch

I gave myself a day off today as I had slightly overdone it earlier in the week.  In fact I have had two days off, as yesterday all the family joined us for a 70th Birthday lunch for my husband at our local Chinese Restaurant.  We were the only customers in at lunch time.  I think because they don't advertise that they do a set Buffet (eat as much as you like) on a Saturday - they only advertise the Sunday one!  As usual we got really spoilt as we are quite regular customers for family celebrations. 

The staff all sang Happy Birthday to Derek and brought in this ice cream complete with candle - which I will add the grandchildren all shared!   (The Manager did say that he would have ordered a stripper for him, but didn't think his heart would cope!)

After lunch we all came back to our house for a slice of birthday cake and a cuppa and spent a pleasant afternoon in the garden.

The Birthday Boy and his Icecream


So to today - as it was such a lovely day I spent it sitting in the garden painting!   I finally got to painting the last side of my paintstripper holder.......


...... and I then started on my Daughter's holder, which she had brought around for me to play with.  I think I am getting the hang of this paint fusion now and also Steph's roses - I love doing those.  Although mine are actually a fusion of Sheena & Stephanie's techniques!


1st side

 2nd side

 3rd side


Last side

Close up of 2nd side

Close up of 3rd side

thanks for looking

Mags

Tuesday, 12 July 2011

More Paint Fusion


Been playing again - this paint stripper holder is getting a major revamp and I am getting more practise!
This photo isn't a good one, but all the other's made the lavender and wisteria look too blue when I retook them this morning!


and this afternoon I painted this side with poppies and daisies (which are actually slightly whiter in real life).
Now what to put on the last side ....... ?

Friday, 8 April 2011

Paint Fusion - Poppies

As it was such a gorgeous day - I sat outside this afternoon and prepared 3 wooden discs with crackle finish.
I then decided to attempt some poppies for the first time!


First attempt - red poppies on a crackle background of blue with green and ivory mix of paint over the top.  I wasn't too happy with the finish of the poppies, so having got a better result with the blue ones, went back to this and did a little bit of high-lighting to give the flowers more definition - definitely an improvement on the original painting.  Maybe we will make a painter of me yet!


2nd attempt - decided to do some blue poppies (which I secretly love - have tried to grow them. but without success, although my red ones do very well and I do love them as well).  Background on this one again crackled, but with ivory with a dash of red mix over blue.

I was more confident painting this one.  I used two shades of blue and white.   I really must treat myself to the proper paints - although I am getting better at mixing enough of the colours to do a whole project.

I am quite chuffed with the result really - especially this blue one, as I have always wanted to paint, but never been any good - just need some practise with placing the leaves now!

Sunday, 20 March 2011

Paint Fusion - Berries

Well I have done it - produced my first Paint Fusion Effort - actually using acrylics (yes I know I did a couple of practise attempts with icing but this is the real thing!)


Whilst in town during the week I treated myself to some paint brushes from The Works, and some acrylic paints from Wilkinson's - yup that's me - last of the big spenders!   I got 7 large tubes of paint at 99p each and a box of 12 small tubes for £2.50 - so under a tenner!   I thought I would have a practise just to see if I could do it and I can always invest in the proper paints at a later date.   The downside was that I had to mix my shades first, but it wasn't too much of a problem.  I also bought a cheap larger set of paint brushes from Wilkinson's but they weren't brilliant - but sufficed - shall look for a better set.

So I am secretly quite chuffed at my first venture into painting - I have never been good at art, although I like the relaxation of colouring stamps with promarkers, and am getting some results now with water-coouring, but I always wanted to learn "barge painting"/folk art.  (My family will tell you that the only think I can paint is emulstion on the walls - although I prefer wall-papering, and for heaven's sake don't let me loose with gloss paint! - undercoat yes - gloss NO!) so this really is an achievement for me.  Have even amazed my kids - and my son and his wife are both brilliant artists!

Finally I will own up to a couple of "happy accidents".  I didn't quite achieve the transparent centres to the flowers as per Sheena's DVD.  However, having obliterated the stamens on the stamp, and painted the yellow centre - I had a brainwave - I re-inked the stamp and wiped off the petals and just stamped the stamen part over the paint!  result!   Also when I came to stress emboss the edge and the swirls - I didn't think the versamark had stamped for the swirls - so I redid them - seems I now have swirls of ribbon!  - have I discovered a new technique quite by chance?  bet I couldn't get the same result again!


Thursday, 10 March 2011

Paint Fusion - or should that be Icing Fusion! - 1st attempt

Well it has been a day of problems with the internet today - think BT are mucking about with the phone lines!  So having had another fix of Sheena's DVD and getting eldest granddaughter hooked - I decided to abandon cyberspace, and try my hand at some paint fusion!  Only ONE big problem - don't have any paints, and only bristle brushes!   and I was itching to have a go!

Anyway undaunted I decided to have a bash at practising with icing as I had a tub of it mixed up and going to waste!   Was a bit diffiicult to gauge what consistency I needed the icing.

I covered a board with ivory regal ice and then pressed the daisy stamps lightly to get a rough outline.  I didn't want to make the first blue coat too dark, but think I could have been a bit bolder adding the colour - but hey ho this was a first practise.  If I did it with icing again - think I would coat the board first with Royal icing rather than sugarpaste and then with my food colour pens stamp the image - although as this would never be eaten - could use ordinary inkpad I suppose.

So here are a couple of views of my first attempt (different lighting!) - bit "el crappo", and the leaves need a lot more practise and alteration of the consistency, and I also did them free-hand!


No doubt about it - got to order some proper paints and get the synthetic brushes!