Going Green Blog Background

Showing posts with label Fabric painting. Show all posts

Friday, 25 March 2022

Painted Cushion

Work in progress


finished cover
 
Had a relaxing time painting this  (excuse the crease in the photo).  It was a Craft Buddy kit.

Here it is is with a cushion pad in it.

Tuesday, 25 February 2020

Fabric Painting


My daughter and I had a "play" day last week - rare occurrence these days  We decided to do some fabric painting with some of the kits I had from Pink Ink Designs.

These are my efforts.   First picture shows the mouse fairy in progress, and the next picture is the decoupaged section which is to be added.  It looks a mess in the photo, but when cut out looks entirely different.   The decoupage elements, were also painted with fabric decoupage glue, which when dry stiffens them.


decoupage elements

and here is the finished piece.  I confess I cheated and glued the tiny tiny beads on to the flowers, as I really couldn't see to sew them on!    I may add a bit of embroidery on her dress as some point in the future.  She will then be mounted either in a picture frame or an embroidery hoop.


I also painted this one.  Eventually she too will have some embroidery added, and will be mounted - either in a white frame or an embroidery hoop.


Tuesday, 22 January 2019

Embroidered Butterfly ... or is it a Moth on Wood?


Whenever you buy a Pink Ink design, you get one of these butterflies as a freebie to play with.  I decided to play with one of mine.  I painted the butterfly a couple of weeks ago, and confess I made a booboo - I put it on the radiator to dry, and of course it made the canvas that touched the ridges of the radiator dry much darker as it set the colour!   duh  I thought.

A couple of days ago I decided what the heck,  I will try some embroidery stitches on it that I had seen demonstrated.   The outline was done with a running stitch and then I wove another colour through the stitches..  I then embroidered the body, with a mixture of satin stitch and chain stitch, alternating the way the threads went in the different sections.  I then embroidered part of the head with button stitch and stuck a clear gem in the centre.  The antennae were done with back stitch and then a stretched french knot.  I added a couple more gems on the wings, and coloured all the gems with alcohol pens.

Finally what to do to get rid of the lines across the middle ?  Inspiration struck make it look like wood - phew think I have got away with it and I am now calling it a Moth on Wood rather than a butterfly!

Thursday, 17 January 2019

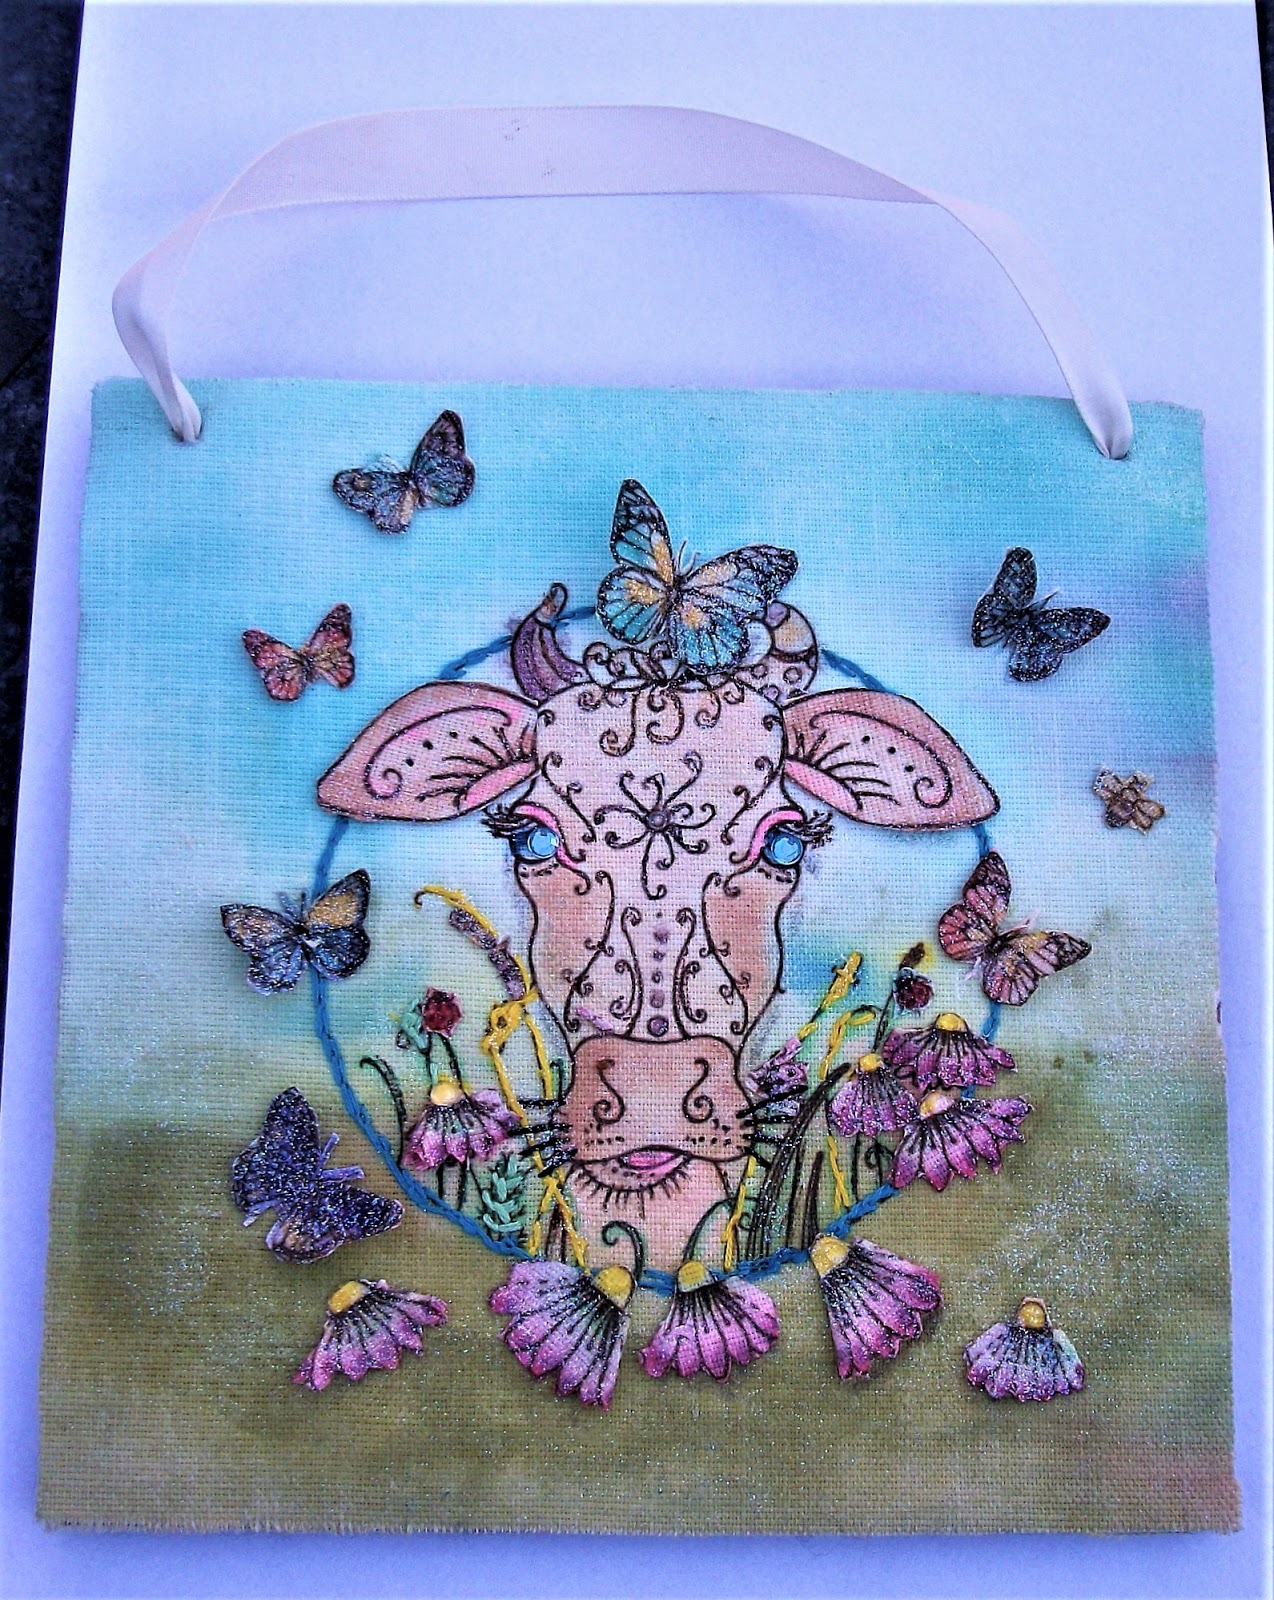
Moo Cow Canvas


Finished plaque


Another Pink Ink Design.  I must admit I am enjoying doing these.   I painted the canvas and the elements (see picture below),  I used various paints - some translucent ones from IndoBlu and some from Cosmic Shimmer, with a few elements highlighted using Posca pens.

I then did some embroidery on the main canvas - outlining the circle with chain stitch and then picking out some of the grasses etc.

The elements and the canvas were ironed to set the colours and then had IndigoBlu Slap it On (Fabric) applied to seal it.

I couldn't decide how I wanted to display the canvas - pondering on whether to use another embroidery hoop, but then I decided to use a square MDF plaque.  I used some  lining material from The Mill Shop online, which was adhered to the canvas with their special bonding material.  (Confess I have forgotten its proper name).I then glued the padded canvas on to the MDF board, and created holes in the canvas with a screw punch to align with the holes on the MDF, and added some ribbon to create a hanger.

I then glued on the various elements - I found heavy gel medium excellent for this.


Thursday, 10 January 2019

Mixed Media: Decoupaged, Painted and Embroidered Panel


Really pleased with how this turned out.  I have watched the PinkImk demonstrations on Hochanda many times and have been tempted to try one.   A few weeks ago they had a bundle of various designs on sale at a silly price - so I though I would take the plunge.

The panel is about 8" x 8" with an extra little panel of embellishments.

I wet the material and then water-coloured it using Cosmic Shimmer Fabric Paints, and IndigoBlu paints for the face.  When it was dry I ironed it to set the colours.

I then painted the embellishment section and when dry I did some embroidery on it and added some beads (i.e. pearls on the bow).  Again I ironed the panel to set the colours, and  then painted a mix of pva and water to the back to strengthen and stop it fraying, so that when dry I could cut out the items.

The little elements were then added to the panel with glue.  I also did a little more accent painting, as well as adding some gems and Nuvo drops.

It doesn't show up that well in the photo, but the image is very sparkly, as I went over the whole design with Cosmic Shimmer Sparkle Star Fabric paint.  (I am in love with this - the effect is similar to a sparkle pen on cardstock).

I will eventually stiffen the whole thing with either PVA and water or IndigoBlu Fabric Slap it on.  I also want to get some matching velvet ribbon for the frame (although I may paint it) to finish it off completely.

Wednesday, 20 June 2018

Experimenting with Fabric Paints and Stamps


The title says it all ...   I used some new stamps and stamped on some calico with Stazon.  I then had a play with Posca pens.    I need a bit more practise, but can always go over them again.

Monday, 11 June 2018

More Fabric Painting


I have really enjoyed painting these little calico images.  I think I have definitely mastered painting faces.  (Would be great if I could also draw them myself too, but that is asking the impossible!)

Painted mainly with IndigoBlu paints, with a few elements painted using Posca pens, and other Fabric pens.

For the surround this time, I used Slap-it-on and Luscious powders.

Before I framed it (at least the framing obscures the rogue mark!)


I also painted this little fabric panel from the series, but not so happy with this one,  I couldn't seem to get the shading of the peony petals surrounding her head right.    (Also note the frame was actually gold and not the brown it appears in the photo   !)   Maybe if I put her in a white frame I will like her more!

Wednesday, 28 February 2018

Upcycling a stool.

Before

I have been meaning to do something to this tall stool for sometime, albeit I rarely use it.  I have had it for more years than I care to remember, and in fact I think it might even have been my mum's at one time.  (It was the stool I used to sit on when decorating cakes many moons ago).  It has seen better days!

Seat - before

As you can see it also had a material top, which was always getting "grubby".  Anyway I had a vision of how I wanted to revamp it.  First it was cleaned and rubbed down a tad (Don't you hate preparation?  I did cheat slightly and instead of creating a mess with sandpaper, as I was working indoors, I used my hand steamer, a scourer and a microfibre cloth).

Painted with Dove Grey Glitter

I then painted it with Crystal Glitter - Chalk & Glitter - Furniture Paint in Dove Grey.  ( could have used the antique white glitter paint, but opted for the grey.  I gave it a couple of coats and then waxed it with Rustoleum wax.  I love this gliter paint it just has a subtle glitter in it.

Close up of Glitter paint

Then it was time to tackle the top.   I discovered that the seat removed, but didn't want to go remove and remake the pad.

The finished seat  (Better picture below)

I gave the original fabric a coat of gesso mixed with some metallic fabric paints and IndigoBlu Slapiton.  I then applied the plain rice paper, and then a tore images from a flowery sheet of rice paper in my stash, Painted on more Slapiton and sponged on more IndigoBlu fabric paints in pink, purple, blue and green, mixed with more Slapiton.  A final coat of Slapiton was then applied all over.
(For any non-crafter wondering about Rice Paper - this is like tissue paper - and you could actually use a single ply of a napkin.  Rather than cut out the images, you apply water to the paper around the image you want, and gently tear it away from the rest of the paper).

The bonus is that the seat is now easily cleanable with a damp cloth!  (win, win!)

Make-over complete

As I took the early photos indoors, I decided to try and take a better one outside - erm yes we had a little snow today!
The finished seat


The outside pictures are a more realistic colour than the one taken inside at night!   I wanted a vintage feel, and think I have achieved what I aimed for.

If I get fed up with it, I can always apply some more fabric paint, and either stamp on it or do some paint fusion (folk painting) on it.

Sunday, 2 July 2017

More T-shirts

Last week I shared the T-shirts that my three youngest grandchildren had painted.   Today I have sat and painted three more for them.

Regardless of the colours in the photos - they were actually all white t-shirts.


This first one was stamped with Threaders fabric inks and stamps.  I created a template on a piece of paper to get the positioning right, and put this under the material as a guide.  (In fact I used the template as a guide for all of the printing, to ensure I got them in the right place.
Can you guess my granddaughter's name?


This second one was created with Threader's stencils and metallic fabric paints, and then stamped with the Threader's inks and Clarity Stamp mini fairies, and was for the five-year old.   


I had no idea what to do for the 8 year old - she had said something about wanting bananas in pyjamas - erm yes well no!  lol!   Looking through my stash I came across the dog stamp from My Clarity Stamp Club, and thought ummmm - she likes dogs.  I then found the butterfly stencil, and decided I could probably combine the two.   

Printed the dogs on the t-shirt with Threader's ink, and then masked it with a circle and played with the stencil using various metallic and plain fabric paints.   


I trust they will all like what I have produced!

Monday, 26 June 2017

Hand-painted T-shirts

It was inset day at school for the youngest granddaughters last week.   We started off with quiet "mindfulness" playing with them colouring in the new books I bought them ....... and then we got a bit messier.

I bought some plain white T-shirts from Craft Crocodiles the other week,  I got two of each size - one for me to paint and one for them to paint.

Here are their results:

11 year old's effort using metallic fabric paints and a stamp


8 year old's creation.  As you will see from following pictures
she did rather a lot.  Using metallic fabric paints for the square, and
fabric ink pads and stamps for the rest.


5 year old's creation - using stamps and fabric ink pads


Showing off their T-shirts
They really had great fun, and were so pleased with their efforts.  Now for me to come up with some designs for the second shirts.

Sunday, 4 June 2017

Fabric Stamping


the T-towel is actual more white in colour!

I had fun yesterday afternoon.  My daughter came round for a bit of crafting.    We decided to try out some new stamps and inks.  The make is Threaders by Crafter's Companion.

We have used the wooden blocks and fabric paints before, but these are rubber stamps and ink pads.  As you can see we had a lot of fun - no pattern just both randomly stamping on a t-towel.  (You may note that a few Clarity stamps also crept into the design - well you have to experiment don't you?  Can you spot them?  We also used a couple of wooden block stamps with the inks)

The stamps in the set are flowers, leaves, butterflies, dragonflies, bees, feathers etc.  We didn't use all of them!   The great thing is that you have a lot of filled in shapes, and then detail stamps to stamp over them.   I particularly like the feathers and the little birds for infilling: however. my daughter was hooked on the honeycomb and bee stamps, as well as what we described as sprigs of lavender!  (She got quite crafty with those, inking up the stem in blue and then adding the purple lavender flowers!)

When I watched the demo on tv, they actually were more methodical and drew out a patchwork outline with dissolvable pen, and then just stamped in the squares.

We just did stamping, but you could use the designs for free motion machine embroidery, or even hand embroidery afterwards.   Another idea would be to stamp on the end of a silk scarf.  (My daughter will probably be using her embroidery machine!)

I just thought the grandchildren would like creating things with them, and I have got some pencil cases for them to decorate, and have also bought some cheap t-shirts, which I am hoping to play with for them.

another view - more realistic colour, as the T-towel had been sort of tie-dyed
with some left over fabric paint.  (note to self iron it before you stamp - lol!)
As mentioned the T-towel wasn't completely white to start with, as I had followed a hint using left over fabric paint, which I had added to a bucket of water and scrunched up the T-towel and left it to soak!

Saturday, 5 November 2016

Something Completely Different!


I had fun today - just playing!  I watched the Colourlicious Shows on Hochanda yesterday, and was inspired by the use of gelli plates for block and reverse printing.

Well I didn't have the large gelli plates that she was using, but I do have some mini shaped ones from Clarity, and I had some blank tea towels! So nothing ventured, nothing gained.

I tried doing the block printing the way Jamie showed, but found it a little awkward, so using the little gelli mounts, I used them like a stamp.  She also used a brayer on the gellis, but I found that made the background too light for the effect I wanted, so I just used a sponge on them.

I do have some of the Indian wooden block stamps in my stash (albeit only a few) so I used what I had and did the reverse printing, by stamping into the gelli and removing some ink, before stamping on the tea towel.   I also did some ordinary stamping with the Indian stamps, as well as using a couple of stencils (a random leaf effect one near the centre and Andy Skinner''s Fossil stencil  to fill in the triangles around the edge.   White "gaps" and the edge then just had the textile paint applied randomly with a sponge.  For info the gellis I used where the triangle, hexagonal and oval.

This is sort of work in progress at the moment, as I haven't decided whether I want to fill in the rest of the white of the tea towel yet.


Sunday, 25 September 2016

Fabric painted bag (the other side)


You may remember that I attempted to do some fabric painting on a bag the other week; well I purchased some new stencils, the other week, and the finally arrived.

As you may recall, I wasn't happy that the owl on the other side, and didn't feel it "popped" enough, so this time I created a white background.

I placed the mask on the bag, and then placed masking tape around it to outline the size of square I needed.  Removing the mask I painted the square.

The mask was then put back, and the tape moved to hold it in place.

Finally with a stencil brush, having removed the mask, I randomly stippled the blue outline.

close up

and just to remind you - this was the first side.    (I think I might use the stippled edge idea, and add to this with a white stippled edge - that should make it "pop" more.)
the first side

I had intended to spend the day yesterday with a paintbrush in my hand, after stenciling the owl, but unexpectedly I had to look after my youngest granddaughters, so I though I would share what they got up to to prevent me from doing "my thing"!

Obviously it involved stencils! but I played it safe and they used card and water-colour paints.   They also raided my stash of flowers etc.

The 7 year old's cardboard bag - 1st side

and the reverse side

The 4 year old's stenciling and collage

another by the 4 year old - but she was getting tired by this time - lol!


Wednesday, 14 September 2016

Fabric Painted Bag


I treated myself to this owl stamp recently from Blockwallah.   (My family are a bit owl mad so knew it would be put to good use - just have to make sure that it doesn't leave the house and find its way into the hands of my daughter and eldest granddaughter! lol!)

I was watching a programme on Hochanda where they were painting on fabric and it inspired me to have a go with a similar idea.

The only bag I had in my craft stash was a Hessian one - so the image is more subtle than on a white background, but hey ho - work with what you have got.

I masked off the area, and then mixed some acrylic paint with Decoart fabric medium for the background in gold and gold with a beige added.  I dried this and then using proper fabric paints, I stamped the owl and the leaves.  Then using a paint brush and more fabric paints, I coloured in the owl and added a few more leaves by hand.

I felt that the image didn't stand out enough from the hessian, so I carefully moved the masking tape, and re-positioned it, and with a sponge went around the edge with more fabric paint.


close up of design

I have some stencils on order for an owl and some toadstools - so watch this space for when I tackle the other side!

Thursday, 25 August 2016

Pencil Case

Front

My youngest granddaughters needed a pencil case - and I remembered I had a blank one to paint - so it was out with the fabric paints and my special Indian Stamps.   It's not brilliant, but it was a very quick play.
Back

The base