Going Green Blog Background

Showing posts with label Pebeo paints. Show all posts

Thursday, 4 July 2019

A little fun plaque


A little piece of mixed media for this one.  Once again I can't remember where all the bits came from, apart from the fact that I bought them at Farnborough, I do know the sentiment was a SamanthaK one.   The coffee cup was a die from my stash (at this point in time I can't remember who that was from either, and the packaging has gone missing - how do things suddenly disappear off your desk when you have just been using them ?)

The roses were made freehand from Hearty Clay, coloured with a smidgen of food colouring and then brushed with cake decorating dust.  The leaves were done with a cutter, and again coloured and dusted as before.  

The sentiment was glued on the plaque, then the whole thing painted with black gesso, and then overpainted with Pebeo blue/black iridescent paint and finally Pebeo gilding wax in  silver and gold was applied, and the coffee cup, which was cut from Kratt card, had the same applied

Monday, 24 June 2019

Another journal cover 2)


As before but using part of the dragon mould


showing the two matching journal covers side by side


Monday, 17 June 2019

My First Journal Cover


I had fun doing this.  Using the new moulds from the Katy sue Fantasy range.  - Dragon scales, Dragon, Swords, Shield and Iron Alphabet and Hearty Air Dry Clay.

The cover was painted with Pebeo Blue/Black.  The Dragon scale panel , dragon's head, the swords (shortened to become daggers) and the initials were also painted with blue/black.   The shield and wings were painted with bronze.

When dry the items were all highlighted with Dailyart Patina waxes in Emerald, Black Pearl and Amethyst, and I also used Pebeo Gold and Silver gilding wax.

Below is another view in a different light.


Monday, 20 May 2019

Violin


I treated myself to one of the Bizarre-ology violin kits.   Here it is made up.  and here it is painted ....


The paining didn't quite go to plan - I originally wanted a crackle finish on it - but my crackle didn't really want to work - actually it was so fine yo could hardly see it.    However undaunted I kept going!


I started by applying white gesso, the Pebeo Dyna blue/green paint.   I then applied buff titanium mixed with  crackle paint.  It was then dry brushed with gold and silver paint and some was applied by scraping across the surface with a palette knife.

I then applied some rice paper images that had a bit of music on them, and added a little more titanium buff and gold to blend them in around the edges.

I add flat back pearls to the keys, and a smidgen of gold paint to the strings (which were supplied with the kit and had a little sparkle in them).  I also applied a little buff titanium and gold pain to the ribbon on the bow.

It needs a coat of varnish and I am waiting for my matt varnish to arrive, though I may change my mind and paint it with a glass varnish if I don't like the matt finish.

Wednesday, 6 March 2019

"Wicker" Trug/Basket

I wasn't quite sure how I wanted to decorate this little basket shape.  I then had the idea of trying to make it look like  wicker basket.   I decided to use a technique used in cake decorating of a basket weave.  Now in cake decorating this is done with icing and a nozzle.  Erm maybe not a good idea to use a nozzle and ruin it - so I experimented with Golden Fiber Paste and a fork. (I think it has worked!)

It was then painted with Pebeo Yellow Ochre and when dry overbrushed with Pebeo Dyna Irredescent Precious Gold.

The centre handle and the insides were painted with  various shades of brown, yellow and cream colours to create a wood effect.

I was originally going to decorate it with some flowers, but had the idea of making some straps as "hinges" for the lids.  I created these from Hearty Soft air dry clay and used the Katy Sue strap mould  painted in various browns and the metal parts highlighted with Pebeo Guiding Wax  


The top


a couple more views


Saturday, 29 September 2018

Back to Halloween


Well the last couple of posts have been "pretty" - so today I am back to ghouls and ghosties, with this littles mdf project.   It was part of a collection of kits I bought, which included this tombstone, and a haunted house and lots of accessories.  It also came with the faux moss.

The main tombstone was sprayed with granite spray and then painted in various shades of grey.  It was then sprayed with silver marbling spray.  oh Wow, am in love with this effect.   

I then painted the various embellishments ( I do want to do a bit more to the pumpkin, he is not shaded enough to my liking at the moment, so a bit of work with some paint or distress inks is required methinks.  I shall also add either some jewels or Nuvo drops to the eyes of the cat, ghost and pumpkin.  I am also thinking I need some red paint of Nuvo drops, dripping down form the RIP. !!!!!! I think I might also put some phosphorescent gel on the white paint.   (Well if I am going to scare the local kids .... I might as well make a good job of it!)

At least my bad closework eyesight paid of when I wrote the Happy Halloween - I purposely did it shaky writing - lol!

Wednesday, 4 July 2018

Purple birdhouse


I had a pal visiting for a few days last week, and she loved my earlier birdhouse.  Well there were two in the kit. so I offered to make her one.   I asked what colour she would prefer and she said purple.

Well I took a bit of artistic licence with the purple, and used a couple of shades.  I also know teal is another favourite colour, so I made some roses and leaves from GMM air dry clay.  I also battled with that perishing butterfly die and managed to cut one out, and painted that too.  She is also a steampunk fan, so whilst looking for the veiner for the leaves, I discovered my Katy Sue cogs mold, and made a few clay cogs, and painted those with Cosmic Shimmer patina paints.

My pal also loves Pebeo DYNA paints, so I felt they had to be incorporated, and applied this to rood, which had had fibre paste roughly applied to it.   Her favourite favourite DYNA is blue/black - so I painted the stand with that!

Having thought that I had finished it and taking the photo above, I realised that it needed a little more decoration .... so the Nuvo drops came out!


Friday, 22 June 2018

MDF Birdhouse


Another of my MDF Models    This one was painted with Pebeo paints and two shades of blue Amsterdam paints.

I used Golden Fibre Paste for the texture on the "straw" roof.  I painted a vine and leaves with Indigo Blue Olive Waistcoat, and created some little flowers from FMM Air Dry Clay.

Sunday, 27 May 2018

Yellow Roses


I prepared this mdf plaque a short while ago.  I loved the crackle, but it was too dark for the plaque I wanted to make.   Well I couldn't let it go to waste - so I painted some roses on it.

Friday, 25 May 2018

Freesias

                   
A pal's mother is 90 at the end of the month, and she asked if I could create something for her, as when they called in with some rhubarb for me the other week her Mum was admiring my fairy houses and other creations.  My mind went completely blank "what could I do for a 90 year old who suffers with dementia?"

I discovered that she loves the colour yellow and roses and freesias.   I knew I had a freesia stamp somewhere in my stash, but couldn't find it - so looking online I found this Clarity one, and knew it would be perfect.

I painted the mdf plaque from my stash with white gesso, then applied crackle paste and overpainted with a pale green/blue.   When the paint was dry I stamped the two images with black archival ink and added clear embossing powder.   The freesias were then painted with Pebeo acrylics.

I then applied two shades of blue distress oxides mixed with glycerine around the edges and in odd places.  A coat of spray varnish was added to seal the images.  The back was painted using the same colours as the front with highlights of distress oxides.  Finally pebeo gilding wax applied to the edge, and the string hanger added.

Friday, 4 May 2018

Gypsy Caarvan (Vardo)

How could I have forgotten to share this.   It took up enough time to do, and the reason why I missed a lot of blogging.
Front
All painted with Pebeo acrylics with a little detail on the wheels done with pen.   Finally a coat of spray and shine to seal it. I think it is self explanatory of what I have done painting it - so pictures following are work in progress finishing with the start,

Perhaps the only thing I should add was that rather than have empty windows I painted some rice paper and stuck it behind the windows,

Side and Front

Side

Back
Work in progress - top painted and wheels etc added.


Wheels decorated

Close up of wheel decoration

The original start of the build
I had originally wanted the decoration on the front and back to be a bit smaller, but it was virtually impossible - so just went with the roses theme.

I hope you like it.

Thursday, 28 December 2017

Finished Coasters


As you can see I finished the coasters.   The backs are painted the same colour as the holder, and I edged them with gold Pebeo Gilding Wax.  I love the way the iridescent paints sparkle on them.


These are a birthday present for a friend who loves giraffes.   I even managed to do a couple of transfer images on the holder.   A first for me - so was very pleased with how they turned out.

I am going to use part of the scanned images of the coasters for her birthday card ...... so watch this space to see if it worked!

Monday, 30 October 2017

More Christmas Bell Jars


Following on from an earlier posting, I made these two jars for my son.   Very similar to the earlier ones, but a gold base with ribbon, and some Nuvo drops on the trees.

I was also very pleased that my daughter discovered some tealights that fitted the jars in Robert Dyas, so now little jar has a light in it, as so does the earlier one I made.

Sunday, 29 October 2017

My Pumpkin - a Different Take!


As I said a different effect.  I had thought I would buy a white pumpkin, but they had sold out, and the grandchildren bought me an orange one (which was a nice surprise.  So last night I prepared it whilst Miss B was carving her Dad's pumpkin.   (I had made the three holes earlier with an apple corer)/

I applied white gesso to start with, and in hindsight as I decided to go with Pebeo blue/black iridescent paint, I should have opted for black gesso. (Hindsight is such a great thing - lol!).  So this morning I had to give it another coat.

I will also confess here that I originally left the mask area white. but as I was actually painting the pumpkin upside down when applying the gesso and blue/black - the mask was upside down - duh - fortunately I realised this last night, and painted over it!

Once the girls had gone home today, I sat quietly and painted the mask, which was mainly freehand, using deco paints, fine-line markers, pebeo markers and some cardio-stamps and distress oxides for some of the small flowers ane leaves.

I then used the Pebeo deco paints for the flowers and leaves, using the paint fusion technique, with some detail added with pebeo marker pens in white and black.

Another view 1

Another view 2

Another view 3

Th top

Hopefully what it will look like with a light in it

Quite pleased with the effect - I was originally going to dry and print the mask on tissue paper and decoupage it - but decided to have a go at freehand paint it.  (Those that know me will realise I am not very good at freehand drawing/painting so quite chuffed with my effort).

Sunday, 22 October 2017

Christmas Village and Bell Jars - WIP 3

completed items


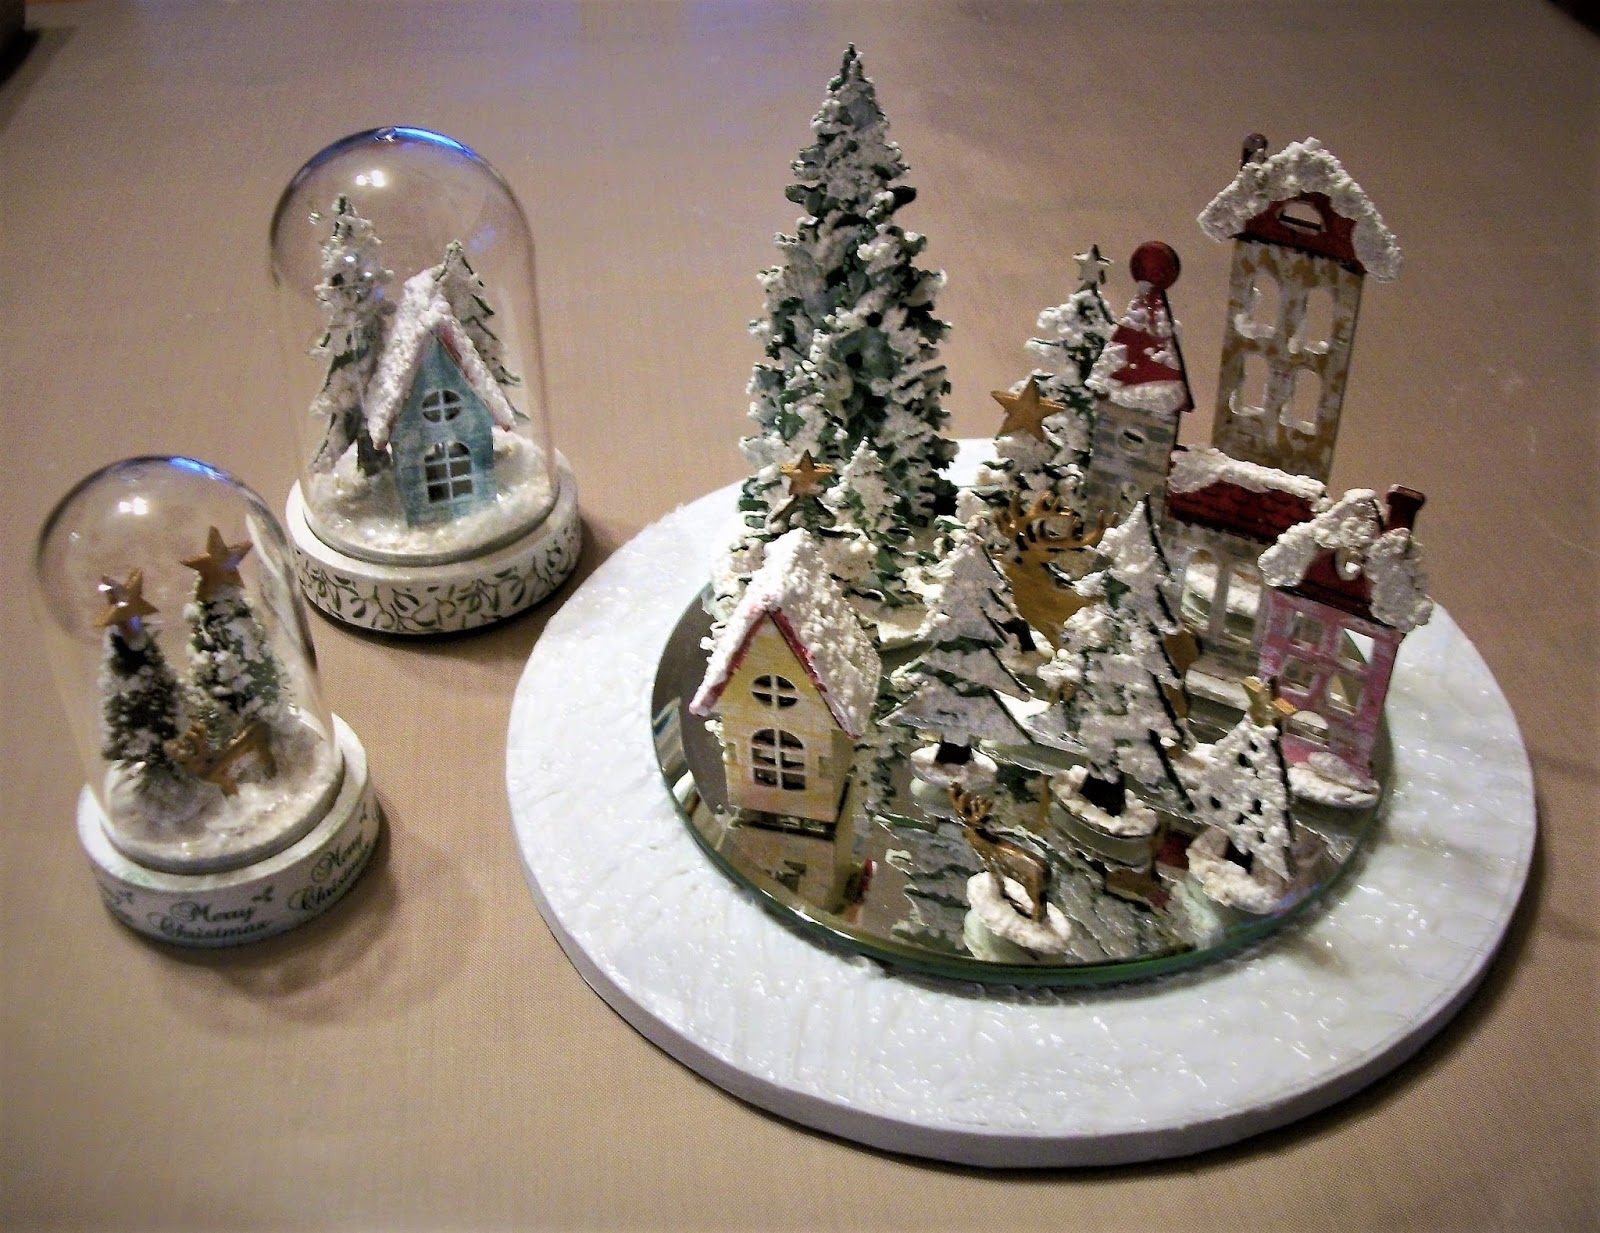
As you can see I have now finished the bell jars and the village scene.

I coated the cake board with white gesso and then applied clear gesso with a palette knife.  Wow the effect was fantastic, just like glistening snow.   I had thought I might have to apply some glitter or  fake snow, but it didn't need it!

I also completed the bell jars.  These had white gesso and white paint applied to the bases and then washi tape applied around the bases.   The inserts had snow effect applied with eXpandIt mixed with white gesso and when dry some glue and artificial snow was applied.

Hope you can see the snow effect on this
And there follows various view, with and without domes. lights.


Saturday, 21 October 2017

Christmas Village and Bell Jars - WIP 2


A bit more of the WIP today.   I happened to see this mirror candle plate in John Lewis and it was perfect for the village.  I also bought a cake board, which I intended to paint in a "snow" effect.  As you can see I have also started to paint the houses, using some mini stencils for the brick effect.

Having put the ornaments on the glass plate, I realised I need to paint the underside of the ornaments white!  Still a way to go to finish the painting as I want.


I also have these two bell jars, which were another kit, and you can see I have also started painting these.  (I applied glitter gel to the little brush trees, but will add white texture past as on the wooden ones, but then apply the gel over that.)   The larger one will have a small string of fairy lights added. (The lights came with the kit and have a tealight candle base,

You can see the brickwork effect on the houses, and I have since outlined the windows with white pen.

To be continued ...........

Thursday, 19 October 2017

Christmas Village and Bell Jars - Work in progress 1.


The start of the painting progress.

I am working on a village scene and some bell jars.   So for the next few days I will share my WIP (Work In Progress).

To start with a coated all the wooden pieces with clear gesso, and then built the houses and trees and started on the painting progress, using Pebeo decoCreme paints.

I then mixed some white gesso with some EXpandit paste and applied it randomly to the trees, the bases and roof of the houses.  This was then heated to create the snow effect.

Watch this space for the next step!