Going Green Blog Background

Monday, 25 February 2013

Setting myself a challenge or two!

When my Mum died in 2004, I came across a couple of unfinished items.  The first was a crochet waistcoat and the the second was a tablecloth with one corner embroidered!

So the reason for a lapse in postings over the past couple of weeks was due to being absorbed in these two challenges.

Now I am the first to admit that I don't DO crochet or embroidery, although I do know the basic stitches for both and have done the odd things in the past.

I did have a little help with the jacket, as the original pattern was in different colours for each round, and the pattern my mum made was all same wool.  It required some triangular sections to finish it off, and I just couldn't work out from the instructions how to make them - so a friend of my daughter's came to the rescue and did those for me.

I then had the job of sewing in all the ends of all the granny squares (a labour of love) and then crocheting an edge to the jacket.  Now there wasn't enough wool left to do what was required in the pattern, so I found some complimentary wool and did most of it with that, finishing off the last round with the original wool to tie it all in.  (yes I am quite chuffed with overcoming that problem!).  

I don't know that I will ever wear it, as not really my colours (as my daughter said "It is very Nanny"), but I rose to the challenge, and might just wear it in the summer!


the completed waistcoat


Now to the second challenge - the embroidered tablecloth.

I haven't done embroidery since my teens - so that is over 50 years ago.  The first challenge as I couldn't find the embroidery silks of mum's that I know I had somewhere was to match up the threads.  Fortunately my daughter came to the rescue, as she and my eldest granddaughter are into counted cross stitch* so she had a large box of silks.

(* well that's another challenge I have started - I got a free counted cross stitch piece in one of my magazines - have never done that sort of embroidery before - watch this space!)

Well I really enjoyed this and it all came back to me - my first corner was a bit "rough" but I improved.  In fact I so enjoyed it, that as I had the original iron-on designs in with the tablecloth, I have transferred some more of those onto the cloth - so that will keep me out of mischief for a while, creating a new family heirloom.  (Of course I could be mean and put it all back in its original bag for my daughter to inherit and let her finish it - or even do her contribution, and then she could put it away for her daughter to add to it anon.  It could end up as a permanent heirloom sampler ....).

No I probably shan't be that mean - so keep an eye on the blog to see if I complete it this year!

The four corners  (mum's original corner - top right)


Sunday, 24 February 2013

Playing with my new toys!

I bought my eldest granddaughter a Gizmo for her birthday, as she was really enjoying making rings and things with a wire jewellery making kit that I bought her for Christmas.   The idea was of course that I might get to play with it.   Yes well ...... it's like this - I have now bought myself one!

I bought the same one as her the deluxe version, which clamps to the table, rather than having to mount it on a piece of wood.

When I ordered mine, I also treated myself to a beginners Thing-A-Ma-Jig, and some wire.  So today I have had a little play and this is my very first attempt with both items.

The bead was made with the Gizmo and the curly bits at the side were made with the thing-a-ma-jig.  Not sure what I am going to do with my play bits at mo - possible add some matching ribbon and make a very simple necklace.


included in my order (how did that fall into my basket) was also some S-lon as I want to make a beaded kumihino bracelet - so watch this space! That's my next challenge


Mags

Saturday, 23 February 2013

oops - I forgot!


Yes bad person me I forgot a pal's birthday - it was on my birthday list, but didn't make it onto the "bible" aka the kitchen calendar.

It was a case of CAP2 to the rescue.  Even then it started off as a mistake, as I clicked on template rather than new layout - another oops - but went with the flow - chose this basic layout and deleted the sentiment on the template and did my own thing with split text.  A bit of faux "embossing" and some shadows added to the layout and a couple of embellishments which were given the same treatement - et voila!  Rather pleased with the result for a quick card!

I edge the topper with a matching Promarker, and added some glossy accents to the Oops and some of the little flower centres.

I then did a quick insert with CAP2: 

insert

Here is another card done in CAP2 for another birthday this week.  The recipient doesn't do flowery, being into heavy metal - so hope she likes this!

I added to the guitar on this one.


Mags

Saturday, 16 February 2013

Green Ruffle Scarf


The description of this yarn says "green", but it is the most gorgeous shiny, silky blue/green - the photo doesn't really do it justice.  The yarn is King Cole "Krystal".  I love it!  Again I have used the Afghan crochet stitch to create it.

Thursday, 14 February 2013

Valentine Girls

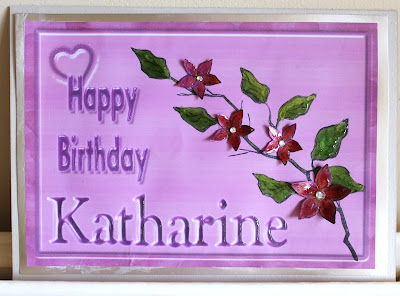
At last I can share these two cards made for the Valentine girls in our family.

The wording/backgrounds were produced in CAP2  for both cards, and then the spray of leaves were stamped and coloured with promarkers, with H2Os over the top. (Sheena Douglas stamps and technique).  The same technique was then applied to the flowers which were stamped on watercolour card.  Finally I applied glossy accents to the flowers and the wording to make it even more three dimensional, and some gems to the centre of the flowers.

Ellie's card has faux matting and layering, but Katharine's had silver mirri matting before adding it to the cardstock.


close up of flower spray


This final picture shows a variation I was trying before colouring and applying glossy accents so that you can see that although the lettering looks 3D - it is even better with the gloss.

Mags

Monday, 11 February 2013

Ruffle Scarves and Needle Felting


At last our replacement for our missing order of yarn has arrived, and I was able to make this red ruffle scarf over the weekend.  It is not a long one as my Daughter in law, who will be the recipient, didn't want a long one, so I only used half a ball of yarn.


Random dye red ruffle scarf


I also had a play over the weekend with some needle felting.  The leaves were completely "free form*, but I tried an experiment with the flower, by drawing a vague shape on a piece of red felt, and then attaching the wool to that.  I then cut into the shape slightly to make the petals.  I am probably going to add a brooch back to it.

needle- felted flower

Finally, last night I made this scarf, again using half a ball of yarn.  The yarn has knitted (or should that be crocheted) up quite differently to the red one, and is quite a bit shorter.  This could be because when I weighed the ball there was't quite 100 gms in it!  I also had the problem of a join the yarn - or should I say a tied knot join - however, it fell in just the right place and I was able to carry on with the pattern!  I wasn't looking forward to having to cut the yarn and join it as being random yarn it would have meant cutting quite a section out to get the colours to match up!  Fortunately this one is for me and I am happy with the short length.


Shades of brown and cream

I can't remember if I showed a picture of my original scarf, but am showing it again, so that you can see the difference between the various yarns.  This was made from a 150g ball and I got this long one and then a very slightly shorter one out of one ball !


Thursday, 7 February 2013

Learning how to make material ........

...... and fill shapes with it, as well as a simpler way to make trellis was my "homework" for tonight!   I call it "homework" but it is really just playing with new things I am learning how to do.


The first time I created trellis - it took hours - I have now learned how to do it in minutes, if not seconds!

Should have been doing the ironing - but what the heck - this was more fun and the ironing mountain can wait another day! 


Tuesday, 5 February 2013

Split Text Playing

I have been learning how to do split text today.  Had loads of fun - can see this being quite useful for cards.  It can be as simple or as complicated as you want.   Here are a couple of my play results.  You could keep the split word the same colour, but I went one step further


split text with wording going through it

Text split and then joined together and some  effects added

Monday, 4 February 2013

Abstract FAux Pas!

 
I intended doing some more faux laser cutting today in CAP2 - but it turned into more of a faux pas!   I tried to be a bit clever with some punches before joining the shapes and it went a bit wrong.   I couldn't rectify it to how I wanted it!  So, undaunted I played a bit more and created this Abstract painting.
 
Just don't ask me how I did it!

Sunday, 3 February 2013

More Faux Laser cuts

OK - so I fess up - I am now hooked on the faux laser cuts, and have now learned how to do trellis as well!


White faux laser cut

a quick thank you layout  for Catherine for helping me to create trellis
just playing and creating trellis with a chevron shape


Saturday, 2 February 2013

Faux Laser Cut


I belong to a group on Fb for users of Craft Artist programmes,  and we had a "how to" technique posted on faux Laser cutting, and I decided to have a play - so this was my "homework".  Pretty pleased with my first attempt.  

I originally wanted a coloured  background and a white image - but  CAP didn't want to play and wouldn't change the design to white.   However, the main thing is I managed it, so onwards and upwards as they say! 

It really is very effective and very "on trend".


Friday, 1 February 2013

Enamelling a little metal box

enamelled box


I have been playing with Sheena's new stamps again, and my Pebeo Fantasy paints, and experimenting painting on metal.  This is a little box (bit like pill box) it is 4.5 cm in diameter.  As it is for my use, I have put a little M on it.

If you click on this second picture you can see the different effects of the Moon and Prisme paints more clearly.


another view