Going Green Blog Background

Saturday, 29 June 2013

Slate Heart and playing with my new toy!


I saw this slate heart in The Works yesterday whilst stocking up on some canvasses - well it would be rude not to buy it wouldn't it.  So whilst my daughter was painting her Paverpol owl canvas, and my eldest granddaughter was painting a door hanger and a pencil container, I managed to get this painted whilst we played in My Den.
 
I used Sheena's paint fusion daisy stamp, and then did some freehand leaves and the roses.  When finished it had a quick coat of Crafter's Companion spray and shine.
 
I think I need to nip to town tomorrow and see if they have any left and buy them up!
 
............
 
 
AND to show how varied my day has been, I got to play with my new toy - a new computerised sewing machine.  I haven't used one in earnest for some years - gone are the days before I was married when I made all my own clothes.  In those days would meet friends and my husband on a Saturday lunchtime - (although obviously he was only my boyfriend then) - and we would decide where we were going to go in the evening, and I would nip across to the local material shop, buy some material and catch the 3 pm train home, and by 8pm I would have a new dress made, ready to go out on the town!  Those were the days!  
 
I have only bought a new machine, as my old machine - a 21st Birthday present has failed to proceed - such a shame as it did a lot of the fancy stitches this one did and was top of the range in its day - and probably cost a lot more than this one at the time!
 
I didn't actually make anything, but played about with learning how to use it and tried a few of the fancy stitches:
 
practising!
 
now comes the decision ....... what to make!

Paverpol Owl

I promised I would show you:


picture taken in the sun
 
My daughter and eldest granddaughter called round today to spend some time in my Den, as my daughter wanted to paint the owl she made at our Paverpol Workshop, and needed to use my metallic acrylics and gilding wax!
 
 
Gorgeous isn't it.  The main part of the owl is made from an old flannel;  wings and leaves from various textured dishcloths, eyes and branch were from some cotton crochet that she made herself.  Feet were two little polystyrene hearts that were covered with very thin muslin; and the background was T-shirt material.  Oh yes and his tummy was again dishcloth with some wool fleece.

picture taken indoors hanging on the wall.

Saturday, 22 June 2013

That Canvas - a better picture

Just a quicky tonight - just thought I would post a better picture of the canvas, now that it is up on the wall!


A3 Canvas


 and this little one is up on the wall too:


C6 Canvas

Wednesday, 19 June 2013

Paverpol Canvas .... Right Chuffed!


Yes I am right chuffed, this little ol' biddy has who always maintained she hadn't an artistic bone in her body, has produced a "Work of Art"!


Finished Project
 
Can you believe this was created from T-shirt cotton, dish cloths and some flowers I made with paper clay?   This was what it looked like when I brought it home from the workshop.  (I changed the nuggets when I got home, whilst it was still wet, as they only had blue ones at the workshop, and I had fogotten to take my black ones with me!)


The project as it came home from the workshop.


To explain how it was created:

A 12" x 16" canvas was covered with strips of t-shirt material dipped in black Paverpol.  I then created a "branch" from some ribbon  in my stash that I had made christmas bows with some years ago.  I covered it in paverpol soaked dish cloth material and twisted it into shape.

With a paintbrush I painted paverpol onto the roses etc.  that I had made at home from CloudClay. (see pics below). 

I also added a butterfly that I had made from one of Sheena Douglass's stamps (just as well as I had played and had this large one as the little butterflies were too small for the project).  I then covered two polystyrene hearts with fine gauze/muslin dipped in Paverpol.   I have to add here that when I was planning this idea in my head and making the flowers I hadn't realised the size of the canvas we were going to be working on!   Good job I took all my flowers with me and not just the roses and leaves!
 
Painting:
 
The background was almost dry brushed with metalic acrylic paint - blue and green vaguely mixed together, and some bits with just blue or green.
 
The branch was brushed with various green primary elements mixed with the primary elements glaze medium.  More of the green primary elements was brushed on the backgrround material
 
Flowers and hearts were painted in red acrylic and then overpainted with primary elements powder and glaze.  Leaves were painted paint-fusion style and then overpainted with primary elements again.  The butterfly was painted with blues/purple primary elements intially

Finally a touch of pale gold gilding wax was used to highlight more of the background and the flowers, hearts and leaves; and slightly more applied to the butterfly to make it stand out more.

Here are photos of the roses and flowers that I created out of cloud clay in advance of the workshop.

hand-made roses
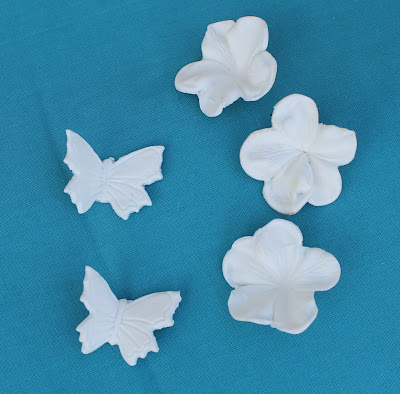
butterlies and blossoms created with sugarcraft cutters


blossoms created by stamping into clay
with Sheena's stamps
the wired mesh ribbon
 
I hope you like it as much as I do - it really is fab when the sunlight catches it!   I can't wait to try and make another one. 
 
My daughter attended the workshop with me and I can't wait for her to paint hers - this is her "before" picture.  She has created an owl - the body was an old flannel, eyes were crocheted flowers that she made, and the branch was a strip of crochet that she had also made.  I believe his wings are bits of dishcloth, and his tummy has bits of natural fleece on it.  It is going to look fab - will post a picture when it is finished!


Friday, 14 June 2013

Experimenting With An Idea - Part 2.....

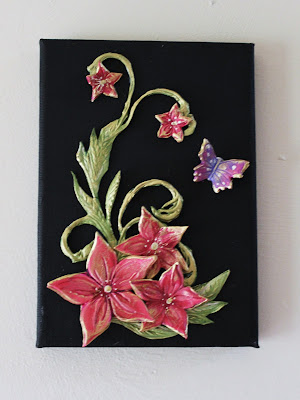
On the 10th June I showed you some flowers that I had made with cloud clay.   This is what I did with them.

Trying to copy something Sheena Douglass had done - I painted a canvas (though I wasn't happy with it as you will discover), and also gave the flowers and some leaves I also made with cloud clay a lick of acrylic paint.  Although the sky was too dark - I did manage to try out the technique with the stencil brush in lifiting off the paint for the clouds!


First layout idea with basic painting on flowers etc.
 
I then got out my pebeo paints and did a bit of "paint fusion" on the flowers, leaves and the butterfly (i.e. double loaded brush)


Next Step

As I said I wasn't happy with the canvas, and these first two were just playing around with the ideas as they formed, before I changed the canvas:

Getting there
 
Ah - my idea of a black canvas worked, but it is not finished yet.....
I added some gold gilding wax to the stamped images:
 
Finished Canvas - picture 1

It was very difficult to capture the real effect of the gilding wax - so here is a picture taken in the sun (yes we did have some today!).   The picture still doesn't do it justice.  The gilding really makes the cloud clay elements pop and look like metal!


Finished Canvas - Picture 2 (taken in sunshine)
 
and in case you missed the original post - this is how the flowers started out  - stamped into cloud clay and cut out.   The butterfly was made with a cake decorating plunge cutter.


And finally - another picture taken indoors last night - trying to capture the gilding and the metallic look of the finished piece.    Unfortunately it hasn't quite caught the 3D element that it has in real life!


I really am chuffed out how this experiment has turned out - I shall be doing more like this!

Wednesday, 12 June 2013

A Quartet of Cards

It is not often I use "kits" or even do very much decoupage, but as I have a friend who is a keen gardener celebrating her 70th this week, I decided to use this kit from the latest Docrafts Goody Bag that my daughter bought for me at the weekend whilst at a craft shop.  It is an A4 card.


It is also my neighbour's birthday this week - and she too is a keen gardener - so I used this little decoupage image from the same kit for that.


This card and it's insert were created in CAP2 for a crafty friend.


and finally one for a pal's son also created in CAP2:


Monday, 10 June 2013

Experimenting with an Idea !

I was watching Sheena on Create and Craft on Saturday, and of course this got me wanting to be creative.  Following Sheena's show was a Martha Stewart one - and I suddenly had an inspiration to find my little packet of fimo and create some flowers for our forthcoming Pavapol workshop next week.
 
Well I couldn't find my Fimo - HOWEVER - I found a half-used packet of Cloud Clay - which is almost identical to the Martha Stewart Paper Clay - RESULT!  So I took myself off to the den with the hope that the clay hadn't dried out!
 
Firstly I created some roses and leaves ready for the canvas I will be doing at the Paverpol workshop.  I am hoping these will be suitable to be dipped in the Paverpol and I can then paint them and add some gilding wax.  (well that's the plan ...).  

The roses were made by hand by what I call the "marzipan rose" technique, and the leaves were cut out with a plunge cutter, which cuts the shape and embosses the veins on it.  I then played with another cutter and veiner and made some blossoms and my butterfly plunge cutter.   (Note:  I worked the clay to a flattish shape with my fingers and then rolled it very thinly).
 
As you will see you can mould/tweak the items into shape before the are completely dry.
 
BUT then my ikkle brain cell went into lateral thinking mode .........
 
 
Roses and Leaves
 
 
Blossoms and Butterflies

..........   and I thought - if I can vein these leaves with the cutter, could I impress a stamp the clay - the answer was YES!
 
Using Sheena's stamps
 
My first try was the little violet stamp on the left-hand side of the picture.  Then I tried one of the fantasy flowers - the first one was difficult to cut out as I couldn't see the outline clearly, so I redid it using some stazon on the stamp first.  much easier!  
 
I rolled the clay thinly and then stamped into it (with the stamp on my rockerblock to get some good pressure).  I peeled the clay off the stamp and then cut them out with scissors.  I then repeated the procedure with some of the smaller stamps.  - you will see that some of the flowers look a bit "mucky" - well I used the offcuts from when I cut out the image and worked them into a bit of fresh clay!  (Working on the principal of "waste not - want not").  It didn't matter, because these are going to be painted and gilded eventually.
 
I also made some of the same flowers with the gel and paint technique to try and compare the results - but it seems with the weather that these are refusing to dry even 24 hours later - so this is definitely a quick alternative solution!
 
I have also stamped an ornate leaf flourish into clay and cut that out  (photos to follow when I have put those and the stamped flowers above onto a project).
 

Sunday, 9 June 2013

That Three-legged Stool

 
Well I finished it - not quite how I wanted it to turn out, probably because I changed my mind about what I wanted to do so many times!
 
First painted with a burgundy coloured emulsion, then crackled with an ivory emulsion.  I then stamped various sizes of flowers with some of my Sheena Douglas stamps, and painted them with some colurs from the Luminarte Primary Elements kits.  I then defined the outlines with some Pebeo cerne relief in silver. I then added various gilding waxes to give it a more distressed look and finally a coat of varnish.
 
As I say not to sure whether I really like it (can always repaint it), however, my one year old granddaughter thought it was lovely and it was just her size when she tried it out when she came to visit - in the meantime it will take my book and mug whilst sitting in the lounger in the garden.  LOL!


another view

Monday, 3 June 2013

Painted Flower Trough

 
I bought a new plant trough the other week, whilst doing the weekly shopping (it sorta fell into my trolley - don't think OH was too pleased to see it amongst the groceries though!  )
 
Earlier this week whilst touching up the metalwork in the garden, I painted it black.  I used "Black Magic" Paint that I bought from Ideal World a couple of years ago.  I love it - not only is it water-based so brushes wash out easily, but it also works on plastic as well as metal.  Over the weekend I managed to do some painting on it.  The ridges made it slightly difficult, and I couldn't use any stamps for that reason, so it was completely freehand!
 
I am now working on my next project - this little stool, but I can't decide how I want to decorate it!
 
 
So far I have painted it with a burgundy paint and then crackled it overpainting it with a natural calico paint, but what to do next.   So many ideas buzzing around my head.  Do I paint fusion it, do I do a decoupage finish with papers or material (possibly stamping on material and then cutting out and applying them ........ or something else ........ decisions, decisions!   (I know what you are going to say - I should have bought more than one and tried out all the different ideas!)
 
I had intended painting it for the grandchildren to use when they came, and originally intended doing something flowery or with decoupage/decopatch type thing.   (Today it was out drying in the garden next to my recliner chair - and it was just right for my book and cuppa - so maybe it will be dual purpose!)


watch this space !

Sunday, 2 June 2013

Material Flowers - Work in Progress.

First Attempt
 
I wanted to make some little brooches/hair clips and made my first purchase of some fat quarters yesterday!  A couple of hours later I had made my first flower.  I wasn't too sure about my first effort.
 
I then made another one with slightly smaller petals, and made 6 this time (although the instructions said five.)  Not sure which one I prefer - five petals is more natural, but six makes more sense using two colours.  So it is work in progress - I shall try the smaller petals again, but five all the same colour!


Second Attempt on right

Altered Art and a fantasy fusioned box.

the finished result!
 
This was an attempt at something a bit different, using a freebie!    As you can see it started life as cigarette case.  Well as soon as I saw it I decided it was just begging to have something done to it.
 
The tin was coated with a mixture of black gesso and modelling paste to try and get rid of the texture on the tin, at the same time it was textured with a "combed" palette knife across part of it.  It was then overpainted with primary elements.  I stamped the violet on to the tin and outlined it with pebeo gold vitrail outliner, and filled it in with fantasy paint.  The leaves and circles were done freehand.  I then edged the tin with gold gilding wax, and added a bit more in places to "distress" it, and then varnished it.   (The cigarette case is marked as a "Limited Edition" - well mine is definitely a "Limited Edition" !)

before and after


box and lid
 
My new Sheena Douglas Floral stamps arrived this weekend, and of course I had to play.  I had this box in the Den, and decided to use that.    A crackle finish first with dark green background and  a pale blue mixed with a bit of green primary elements mixed in with it, to give a bit of variation in colour.  Daffodil stamped on to lid, and also onto a piece of card.  Painted with acrylics, and then overstamped.  A touch of gold gilding wax to the edges of the box, and also a little bit on the daffodils.  I wiped the excess wax on my fingers over the box for a bit of extra distressing.


top of lid