Going Green Blog Background

Thursday, 26 June 2014

Experimenting Again - Mixed Media ....

...   with a Vengeance!


Top View


Well I got carried away with this project!   It started off as a metal cigarette tin.

A sheet of Pebeo cotton canvas was painted with blue and green metallic acrylics (non Pebeo)and then run through a Sheena Douglass embossing folder.  

It is too difficult to get the canvas to stick to all of the top of the tin, so the edges had a mix of Pebeo modelling paste (relief paste) and gesso applied to them, and then painted with the metallic acryllic paints as before.

Painted canvas was then cut up and stuck to the tin on the top and sides with pva glue.  Everything was then over-painted with Fantasy Prisme paint in turquoise, and the leaves picked out with Pebeo Ceramic leaf green.  (I am not too happy with the result - think I should have used the Vitrail Glass Paint.)  I also lost some of the depth of the embossing in the glueing process, which didn't help with the painting of the leaves.

Another View showing side


I made various flowers in Cloud Clay, using a daisy cutter.  I used white, and blue mixed with white Cloud Clay.   I shaped the blue ones with a modelling tool for one, and also cutting the petals in half and using a modelling tool for the other one.  The centres were also made in white paste, and textured with a cocktail stick.   When dry the flowers were painted with Fantasy Prisme Turquoise and Yellow Vitrail for the centres.  As an experiment, I used my airbrush and some Culpitt white airbrush colour.  (I bought this this week,  as our little local shop couldn't work out why you would want white airbrush colour! - so I offered to try it out!  - I can see it being useful on coloured paste/icing.  It will also be interesting to see how ti works when mixed with other colours. )  It has just given a sort of speckled effect as obviously the enamel repelled it slightly.  It would be different on a matt surface.  I sealed it with a spot of Spray and Shine.

I also made leaves from a mix of blue and green Cloud Clay, and these were painted with a mix of Prisme turquoise and Vitrail Chartreause Green.

So there we have it - a real "Mixed Media" project!


Close up of Flowers

I also had a little play with an odd piece of card left over from making butterflies the other day, and ran it through another of Sheena's embossing folders, and then painted the dragon fly with drops of turquoise and pink Fantasy paints, and some red Vitrail.


Thanks for dropping by.

Sunday, 22 June 2014

MDF Butterflies and Pebeo


Yes I have been playing with my PEBEO goodies again.   I had a set of three MDF butterflies that I bought back in February at Farnborough Craft Show, which were waiting for me to do something with.


Large Butterfly

I started the large butterfly yesterday (and it was a tad daunting as it is quite large).  I started by drawing some outlines with Cerne relief and filling them in with Fantasy paints.   It looked a bit regimented to me today - so then decided to "go with the flow" - Literally  - and just drop colour into the rest of the areas.

The red in the lower wings was crimson Vitrail glass paint, with fantasy paints dropped into it and left to do their magic.


Medium Butterfly
I kept the theme of the red Vitrail in the bottom wings and mixed glitter medium into it, although you can't really see it when I added the fantasy paints into it!  Anyway I can assure you that if you put a drop of the glitter medium on surface and then swirl the glass paint into it - the glitter medium will take on the colour of the glass paint you are using.  You can also mix it into the Fantasy paints to get flex of glitter in that too.  I did add it to some of the pink Fantasy paints, but it isn't showing up to well.

This one reminds me of fabric.


Small Butterfly
Very similar to Medium Butterfly,  Glitter mixed into the red glass paint - think you can just see it if you enlarge the picture, and then drops of glitter paint dropped into it.  The top wings are reverse of the effect in the medium butterfly where I used blue on pink, and this one used pink on blue (at least I think that is the right way round).  I do know I did the opposite!)

and here is how I did it all in a little more more depth:   You also get the perspective of the three different sizes.


Thanks for dropping by - hope you like my efforts.

Saturday, 21 June 2014

Still Experimenting with PEBEO

I am such a lucky lady to get to play and experiment with a whole lot of goodies.  I have been playing in the Den over the past couple of days, and having such fun.

To save me having to keep writing out what I did I put the pictures of the items into CAP2 and wrote up what I had done.  (Actually I have been very good for once - I normally just "create" and then forget what I used, so I have put to good use a little altered art book I made, and am writing down what I have done as I do it!)

I have to apologise for the first two pictures as there are some typing errors, which I failed to see and didn't correct - unfortunately I didn't save the project in CAP so can't rectify the mistakes without starting all over again - so as the saying goes "bear with" !  Remember you can click on the photos to make them larger so that you can read what is written.
First Play to see what products I had received

The Phospherescent Gel said it glowed in the dark (haven't checked on it in the dark yet).  Bit out of my comfort zone doing an abstract sort of composition, but I think something like this would be quite good for a lad's bedroom.  I am calling it "Planets".  Would probably look good with a few gilding flakes added too.
Playing with Phosphorescent GelI


I had an idea in my head that I watned to create a "Tree of Life" on canvas - like the ones that are done with wire.  I confess I didn't quite work - I should have done it on a circular piece of MDF or similar and then added resin to encapsulate it - but sometimes you need to record your failures!

Tee of Life Experiment

Well that was yesterday.  I think I was lacking in inspiration a tad, maybe because I have been in a bit of pain with a cracked rib!  Anyway when I hit the sack last night, ideas suddenly were popping into my head - Why do they do that when you want to go to sleep?   Of course this morning I couldn't remember half of them,, but I did remember this one -  In my goody package, I had a pad of cotton canvas sheets, and wondered if they could be embossed ......

...well yes they CAN and the effect is fab!


Embossing on Canvas 1

To get a comparison with the effects on a plain canvas and on a painted one - I prepared the other half of the canvas with metallic paint - oh WOW!   Having played with the different effects on the leaves, I have chosen the effect I like best and am going to prepare some sheets and apply them to a project - they are so flexible, they will be like material. It reminds me of oilcloth.  (so watch this space!)

Embossing on Canvas 2

and finally, I had a play with an "Art Nouveau" piece, using the coffee jar we had just emptied!  I didn't have any Pebeo Liquid Leading in my goodies, so used my Martha Stewart Gallery Glass one.  It was a little thick for the effect I wanted, and let's be honest I am not very good at free-hand drawing, I was using inspiration from a Sharon Duncan cd)   (yes ok I know I should have printed the image to the correct size and put it inside the jar, but why make my life easy!)   The red is Pebeo Vitril red glass paint, and the black squares are filled with Pebeo Ceramic black paint.

Art Nouveau Coffee Jar


Thanks for popping by.  I hope I have inspired you with my experimenting and you will try some of the ideas out yourself - particularly embossing canvas paper and painting it - you will love the result!

Tuesday, 17 June 2014

Experimenting

The sun shone today, so after trips to hospital and a stroll around Sainsbury's for fresh fruit and veg, I managed a little play in the Den, before mowing the lawns (should add here not a good idea to mow the lawns as I have a cracked rib - but desperately needed doing and it was garden bin night - and of course nobody else to do it!)


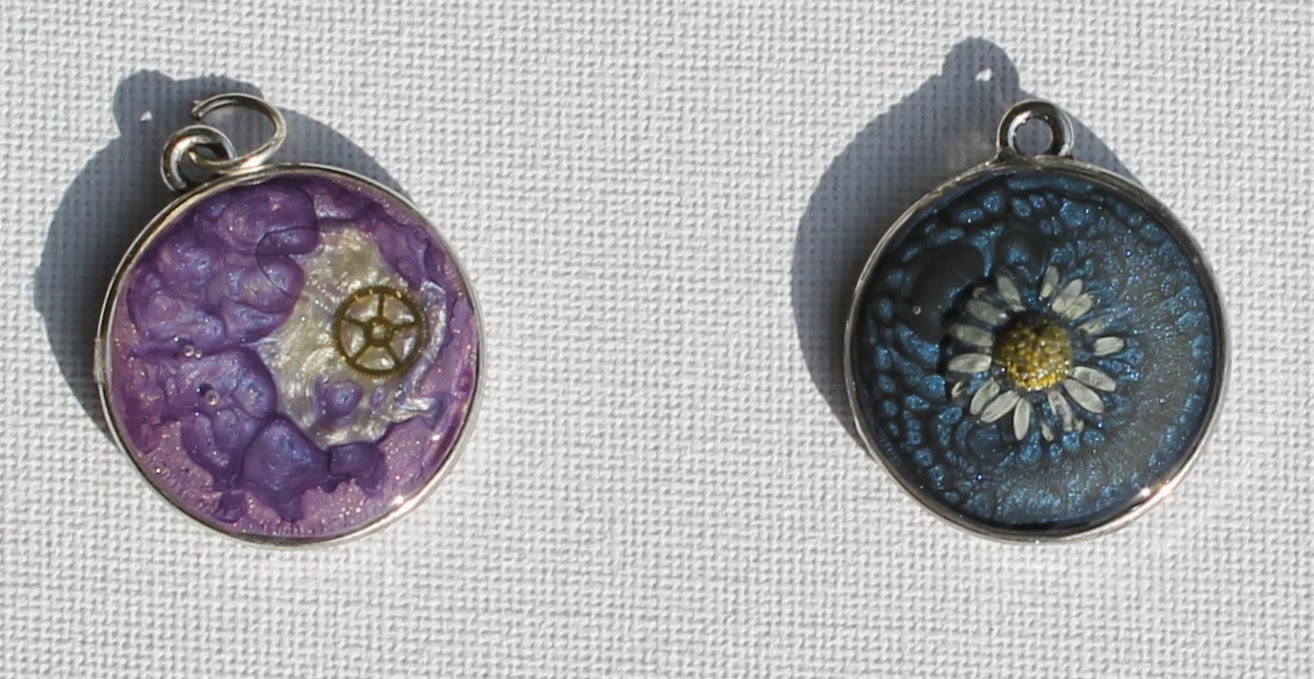
Pleased with these two .I used Pebeo Fantasy pants at base of the bezels. A mix of two purples on the lefthand one,  I then put some oyster colour on a little metal heart shape, and added a small watch wheel, and tried to get it to sit on the purples.  However, this didn't quite wor - the heart sank and the colour floated off the heart, although the little watch wheel stayed on top.  But what the heck - I preferred the random finish to it.    The Blue one was just using one colour, and adding a daisy picked from the lawn before it came to an unlucky fate with the lawn mower!

Both bezels were then sealed with my favourite UV resin product. (Lisa Pavelka Magic Glos).  This is a fantastic product which requires no mixing and you just apply it direct from the nozzle on the bottle, and leave in the sun to dry.  Take less than 30 mins to set to touch dry.


This canvas was my second "Experiment".  Most of you will know that my first love is cake decorating, and I had this idea in my head of trying one of my favourite techniques of Brush Embroidery in a different medium.  
Well ignoring the composition which was a bit naff -(but that wasn't the object of the experiment) - it sort of worked.  I need to make the paint a little thicker.  

Basically I stamped the flowers and leaves on the canvas with grey Stazon, and then made some tiny piping bags (and I mean tiny) and squeezed some acrylic paint into them.  The flowers and leaves were then outlined, and with a damp brush the outlines were brushed toward the centre.  The leaves then had some over-piping on them.  The darker flower were just brushed out with water, and the lighter ones were piped in white, and then brushed out with a bit of the darker colour on the paintbrush.  I also stamped and cut out a flower from card and applied the same technique to that and then added it with some pinflair glue.  (This is the one with the shadow behind it in the centre of the picture.

I realise that I need to add some thickening medium into the paint, as it was a little on the thin side, but of course that is all part of experimenting.  I also think I might try some sort of texturing medium in with the gesso on the background next tie, and then scribe the shapes into it.  

I also want to try doing something similar with outliner and either the Pebeo fantasy paints or glass paints - so watch this space!

Thanks for popping by.

Sunday, 15 June 2014

"Looming"

Penguin charm
My eldest granddaughter came to play today,  when her mum dropped off Father's Day pressie, and this is what we got up to.

We had both computers on with videos running, and she made the really cute penguin charm.  Cute isn't it?

I made two bracelets:  First one using some beads from my stash (need to raid the girls pony bead stash - lol!) and second one is for OH's nurse in colour she requested.

Beaded Ladder Pattern  
Triple Bracelet

My son also called in sporting a bracelet made by his eldest daughter (unfortunately no picture), but I only gave his daughters their loom yesterday - so well done to her.

Friday, 13 June 2014

Experimenting again


I had a "ME" day today, and spent the afternoon playing in the Den.


Inspired by a painting that a pal did, using Fantasy paints on paper, I decided to think outside the box this afternoon.  I had a couple of decopatch shapes, that I wanted to do something with.    The leaf shape had black gesso applied and when dry, I brushed Pebeo Fantasy paints on  to it, guided by the contours of the shape.  I then added the outliner (you would normally do this first).  Rather pleased with the effect, and hopefully it will look even better tomorrow when the paints have dried.  The back of the leaf was painted with a mix of blue and green metallic paints, which will get a coat of varnish tomorrow. 

another view without the sun on it.


I also painted this second leaf, which is in the shape of a bowl - work in progress.


again this was painted with black gesso, and then bronze metallic acrylic, and sponged with some green and red acrylic and some Cinnamon Luminarte Primary Elements and some green primary elements around the top edge.   The back is painted with a mix of bronze and cinnamon primary elements.   I am not quite sure how I am going to finish it off, I think just a little smear of Gilding wax to accentuate the leaf outlines.

I'll add another picture when it is finished.

Finished Bowl - after gilding wax added


Finally, something I did last week for a bit of fun.  I had a tatty fairy ornament on the rockery in the garden, and I gave it a make-over.  ok a bit OTT, but what the heck!  In this house if it doesn't move it gets painted! rofl!


a couple of cards

Two completely different techniques tonight.


I had some pretty paper in my stash, and thought I would do a simple card (and unusual for me it is not personalised on the front - although it is inside).  Butterfly was cut out of some handmade paper I had in my stash, and dusted with dusting brush and ink from Big & Juicy - Mountain Mewdow.  The edges of the patterned paper were also edged with the big and juicy ink too.


and this one was created using the old faithful Craft Artist 2.    I used Back to school and one of the layouts and added to it.  Again it was personalised inside.

Sunday, 8 June 2014

Butterflies continued


I saw a demonstration on sugar butterflies on Friday, and wanted to have a play.  Yesterday I decided to have a practice with cloud clay.  The bottom butterfly was just made by stick each of the sections on wing to each other.   The top was was made "properly" with wired wings.

Today I practiced my airbrushing on them (they were white cloud clay to start with).  I sprayed lime green down the centre of each wing, and heather on the edges, I then over sprayed them with blue.  They were a little "flat" colour-wise, so as I was in the kitchen instead of going to find the varnish, I grabbed the pearl cake spray from the cuboard.  It has given them a lovely sheen.

I could have dusted them colours rather than air-brushing, but it did give me a chance to practise my airbrushing.

Not perfect by any means, but not bad for a first attempt in a different medium.

Saturday, 7 June 2014

Butterflies

painted box


I was in a butterfly mood today.  I bought this little craft box during the week from the Works, for my no.2 granddaughter, who had a lot of micron pens and sakura gel pens for her zentangling for her birthday, and although I had made a little pencil holder for her bedroom, I thought she might need some more storage.

To match the other items in her bedroom I painted some scabious, and then added a butterfly in matching colours.

..........

Butterfly Canvas


I then wanted to try an experiment using a distress technique I saw on Create and Craft, using one of the kitchen scourers on sponge that you use in the kitchen.,

I applied black gesso to the canvas, then using the scourer applied bronze and then red metallic acrylic paint around the edges  The roughness of the canvas helps with the final effect.

Next step was to paint some card - firstly with the bronze metallic acrylic on both side, and then over-painted one side with with Luminarte Primary Elements hot cinnamon mixed with bind and resist powder.  Once this was dry I stamped the butterfly in Stazon, and cut it out.  Bent the wings to give it some "life", and stuck it to the canvas with glue.

I have to say as an experiment I was really pleased with the result, as it was exactly the effect I wanted to achieve, and in real life when the sun/light catches it - it is superb.

Monday, 2 June 2014

Ruffle Rose cake - first attempt


I have been experimenting today as I need to make 3 cakes for a family celebration in July.  Two will be fruit cakes, but for the third I thought perhaps we would have a sponge.  So having learned how to do ruffle roses last month, i thought I would knock up a quick sponge and have a play/practise.  Not bad for a first attempt, if I say so myself, albeit I used the wrong nozzle.  It took an awful lot of buttercream, and I had to make up a second batch to finish it!

A little later when the icing had "crusted off" slightly, I decided to play with my airbrush - pretty pleased with that result too for a first attempt.


airbrushed with red.