Going Green Blog Background

Saturday, 30 June 2018

Steampunk Plaque


I have a crafting friend who is very much likes Steampunk and Dr Who.    I need to make him a card for his birthday, but knowing that he has been a bit poorly lately, I decided to make him a plaque to fo with his card.  

I created the background paper in Craft Artist, and then painted up some embellishments from my stash.  ( I confess that when I saw the man included in some mdf that I bought - I thought I would never use that - how wrong I was - he was perfect - and if I say so myself I didn't do a bad job painting him!)

The cogs and wheels etc were painted with various patina paints as well as quin gold and paynes grey.

As I mentioned he is also a Dr Who fan, son the reverse side I created a Dr Who scene.


Friday, 29 June 2018

Digi Cards


A couple of quick digi cards created in Craft Artist for FB pal's birthdays

Friday, 22 June 2018

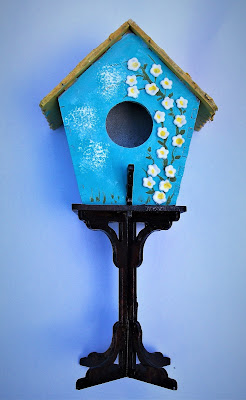
MDF Birdhouse


Another of my MDF Models    This one was painted with Pebeo paints and two shades of blue Amsterdam paints.

I used Golden Fibre Paste for the texture on the "straw" roof.  I painted a vine and leaves with Indigo Blue Olive Waistcoat, and created some little flowers from FMM Air Dry Clay.

Thursday, 21 June 2018

MDF Models


These are the first of a few models I have been working on.   They are from Clever Cut.  You have to build them yourself and then paint them.

So far I have built to jeeps and two biplanes, but have only got around to painting two of them so far.  I did make the mistake of gluing them complete together ..... it would have made life a little easier if I had not stuck the seats in the jeep and not stuck down the supports on the wings of the biplane, as it made painting a little difficult.    I normally think about this when I am building them, but think I must have been tired and not thinking properly .... you live and learn.

They were painted with acrylic paint mainly Amsterdam paints, but the green of the jeep was IndigoBlu Junk and Disorderly paint in olive waistcoat, which was absolutely perfect for the jeep.  The silver paint was from DaliArt.

Not sure what colours to paint the next two.

Wednesday, 20 June 2018

Experimenting with Fabric Paints and Stamps


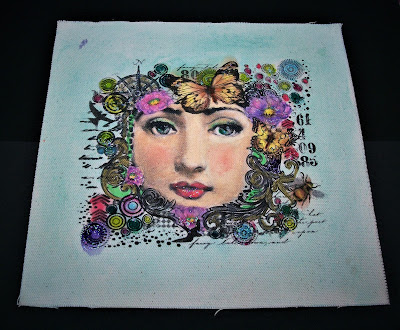
The title says it all ...   I used some new stamps and stamped on some calico with Stazon.  I then had a play with Posca pens.    I need a bit more practise, but can always go over them again.

Thursday, 14 June 2018

Sending Birthday Wishes - an experiment


This card started off as a bit of an experiment - the inner panel was originally supposed to be the card, but I wasn't happy with it.   I used an Inkables stencil and versamark, and then embossed the design, and then used Luscious powders and Brushos over the image, sprayed with a little water.    As I said I wasn't happy with it.

I then took a black card and using the Lilies die cut out the aperture and cut away some of the Lilies.  I then cut down the original background and stuck it down behind the aperture.

Some sentiments were then stamped onto white card using the Creative Expressions Big Ideas stamps. and edged with black,.


It was beginning to come together.  I applied clear sparkle pen to the remaining Lily and placed a gem in the centre.


I felt it needed something else, so I applied some Nuvo White Blizzard Glitter drops to two of the corners ......... this is when it went slightly pear-shaped, as I managed to smudge the drops when I moved the card to let the drops dry.   Oh heck or words to that extent were said as I needed the card dry and ready to post the next morning  (I was making it rather late in the day I do confess - and I didn't have time to start all over again!)

There was nothing for it but to recreate the splodged mess all over the surround, by adding more dots and splodging them with my finger - thankfully it seemed to work.  Not quite my usual style of card, but it is for a felly crafter, who will hopefully think I have just gone for the "grunge" look.

An insert was crated in Craft Artist.

Wednesday, 13 June 2018

Glass Fusing Workshop

Coastrr layout ready to go in the Kiln

I had a trip out on Sunday to The Garden Show at Stansted Park nr Rowlands Castle with my daughter.  She had managed to book us on to a Glass Fusing Course.   It was a lovely day out.   We didn't know what to expect, as we knew nothing about the venue.  Wow it was a lovely setting, and we could have spent a fortune.  Loads of plants for sale, garden items, bit and small, items for upcycling, Arts and Crafts tents, a little forge, a jazz band, falconry displays, Food stalls.  You could also pay to go in the house, or venture to the little chapel to see the floral displays, or visit the miniature railway, the maze, the timber mill or the nursery.   Needless to say we didn't get to see everything.

The image above shows my final design, which will be taken to the kiln and fused, so I will show the end result in a couple of weeks when I get it back.  It is supposed to depict a landscape with water, rocks, fields with poppies, trees, mountains and a sunset sort or sky with clouds.   Can;t wait to see the finished result..

Me with Work in Progress (I changed the final design from this)


My daughter's creation based on Van Gogh's "Starry Night"

Tuesday, 12 June 2018

Random Messing About ....


A small canvas and just playing about with bits from my craft stash.   Black canvas, with various embellishments stuck on and all over-painted with black gesso.   Various gilding waxes were then applied

Monday, 11 June 2018

More Fabric Painting


I have really enjoyed painting these little calico images.  I think I have definitely mastered painting faces.  (Would be great if I could also draw them myself too, but that is asking the impossible!)

Painted mainly with IndigoBlu paints, with a few elements painted using Posca pens, and other Fabric pens.

For the surround this time, I used Slap-it-on and Luscious powders.

Before I framed it (at least the framing obscures the rogue mark!)


I also painted this little fabric panel from the series, but not so happy with this one,  I couldn't seem to get the shading of the peony petals surrounding her head right.    (Also note the frame was actually gold and not the brown it appears in the photo   !)   Maybe if I put her in a white frame I will like her more!

Saturday, 9 June 2018

Framing a Watercolour painting


You will recall that I did a few watercolour paintings the other week;  Well today I found a frame for them.

I only bought one frame, but I have five paintings so far, I intend to swap them around.   I am really pleased with how it sets the picture off.  I can't believe that I have really managed to paint something that is good enough to frame and display.  I confess it brought a little tear to my eye, when I was showing my son, as he was very complimentary, and said how proud I should be.  Great praise from my offspring!  I just wish my husband was alive to show him; but hopefully he is looking down on me and saying "well done".

I also purchased some frames for the paintings that his girls did.  Hopefully they will be as proud, when he displays their pictures for them.

Friday, 8 June 2018

Painting on Fabric


I purchase some little printed calico panels from IndigoBlu a short while ago, and having at last bought the paints I need for the face, I decided to tackle it.

First time I have done something like this, which is basically colouring, but with fabric paints.  It was quite a while ago that I watched Kay's demo on how to paint the face, and it seems I was paying attention, as I am pretty pleased that a) I managed to do it and b) I remembered how to do it!

I used mainly IndigoBlu paints, although some of the finer detail were painted using posca pens, mainly as they were to hand, and I could dispense a small amount of paint at a time, which was more economical.

Yesterday I purchased a frame for it.   Wow that really set of the image.  I feel like a real artist now - lol!   


Thursday, 7 June 2018

Fairy House


A little play with textures on a little Fairy House from The Works,  (I went in to buy something else, which wasn't in stock, and came out with this - lol!)

I used texture medium on the "green" edging, which I then painted.   The walls were done with pearl medium mixed with acrylic paint.  I also made a few tiny air dry clay flowers.  (When I was teaching cake decorating, we used to call these "stamp-plonker" flowers, as they were made with a little spring loaded cutter, and it was a case of stamp, then plonk to create them!)


Wednesday, 6 June 2018

New Baby Cards

As I mentioned previously I had the youngest grandchildren here for a few days, and whilst here they learned that their Aunt has given birth to a baby.   Needless to say they wanted to make some cards.  So here are the results of their efforts:

They were given free reign of Craft Artist and each did their own thing, including the inserts (albeit I am not sharing those, but the wording was lovely and individual, and all their own ideas.)

9 year old's card


12 year old's card


6 year old's card
The six year old put her card in an envelope and sealed it before I had a chance to take a photo, so the image is above is from Craft Artist which is the programme they created their cards in,  It was mounted on white scalloped card. similar to her sisters' ones.

Card I created to send from their Dad and me
As I don't have a lot of baby files on my Craft Artist programme, I think we did fairly well in producing something different from all of us on a pink theme (although as I was last to create mine, I was running out of images to use - lol!)

Tuesday, 5 June 2018

Clay Modelling with the grandchildren, and a visitor's watercolour painting.

 It has been half term week, and I have had the youngest grandchildren here for a couple of days and they wanted to do watercolour painting and clay modelling - so we combined the two.   The first day was spent modelling with air dry clay.


6 yr olds apple with legs and a fairy door

Fairy door
9 year old's "Daddy & BBQ"

12 year old's mermaid on rocks.

This was all their own work (I had been hoping to do something myself, but I was too busy supervising!)  I did get to coat the boards with the texture mediums for the sea and the grass for them, so that they could dry before they got to paint them, and I helped with the initial shaping of the apple, and made suggestions for the painting of the apple.

My Wilton people molds, that I must have had for nearly 40 years came into their own for the heads and bodies, and the Fairy Door was a Sugar Buttons mold.

As I didn't dare risk them painting with acrylics, they used watercolour paints and some goache, which worked quite well  The 12 years old did use some of my metallic Posca pens for the mermaid's tail.

I think they did extremely well.

On the second day, when they were painting, their Aunt (my daughter) called in, and she wanted to try a watercolour painting.  So under my guidance (that's a joke really, as I am only just getting to grips with learning how to do it) she produced her first painting.

Misty Dawn
She wasn't too happy with it, but what a difference when we took the masking tape off - I think it is brilliant for a first effort on linen watercolour paper, with my new Matthew Palmer brushes, and just my guidance.   (At least I had a video recording of a demo to follow when I did mine!)

Monday, 4 June 2018

Upcycling from this ......


........  erm looks interesting .... not


coated with Powertex and a few features added


.... here's a clue

a Fairy Door MDF kit given a coat of Powertex

and finally ......

........ a Fairy House

Yes I decided that rather than throw my poor frost damaged and useless chiminea (it would never drawn properly when you lit it), I would upcycle it into a Fairy House.

I started with giving it a coat of Powertex, and using an old dishcloth repaired the chipped opening, and then using strips of t-shirt material I made a "vine" to wind around it.   I also had an MDF Fairy Door kit in my stash, which was an almost perfect fit for the opening.

I then gave the whole thing and the stand a coat of Crystal Glitter Black Diamond paint, and added some texture and crackle paste to the fairy door and some acrylic paint.

I then made some flowers from FMM air dry clay  (oh gosh I am loving that product). and painted the flowers, leaves and some of the shapes I had already stuck on with Powertex,  with POSCA pens and acrylic pens.   These were then attached with more Powertex, as was the door.   Finally I painted the roses on the lid and on the side, and gave it a quick spray of varnish.

Ta da ..... no longer a useless bit of garden furniture, but a feature for one of the flower beds.

Sunday, 3 June 2018

Lilies


Birthday card for my granddaughter,  using one of my new Clarity dies, and a bumble bee die from my stash.


The background was a sheet from my Clarity paper pad, which was applied to the bard with double sided sticky paper, and then Pergamano glitter sprinkle on and rubbed on.  The bumble bee was also mounted on more of the paper, glitter added and then cut out.  Finishing touches with a few Nuvo drops.    Funnily enough she was more impressed with these than anything.  (She has since had fun using them on a card she made!)