Going Green Blog Background

Tuesday, 30 June 2020

Doodling - Hawaii - work in progress


Last week we spent the week in Hawaii so to speak and by the weekend we had got to this stage,  the penning with just the last postcard to complete.   This week starts off with learning to draw hula girls and cheese plant leaves in the blank space.    This should be fun - a challenge to draw realistic figures.   Fortunately Barbara has created a template to download of her finished piece, so if the worst comes to the worst we can copy her girls.     We will then have the option to colour our piece of hers.

I'll share the result at the end of the week.

Monday, 29 June 2020

More Stash playing again!


  What should have been a simple job to paint this - wasn't!  My own fault as I decided in my infinite wisdom to pain the letters whilst in situ on their carrier "sheet"  ......... wrong!   I know that when MDF gets wet it swells, but I thought as it was so hot and it was drying so fast it would be ok.  Lazy people take the most pains as they say.   It took quite a bit of fiddling to get the words out of the sheet;  and I will confess some of them broke - so it was a bit of a jigsaw putting them all back together.

The back plaque and ring were gessoed and then painted with pebeo blue/black paint, and then gold gilding flakes applied.

Sunday, 28 June 2020

Playing with more stash


Found this cheeky little fellow in my stash, and thought it would be a fun thing to paint on a hot summer's day.    As everything is etched into the MDF, it didn't require a lot of mental effort to colour him.

The decoart neon paints came out again for most of him, together with a little snow effect paste, and some glitter on top of that!

Can't remember the maker of the shape, I just know I bought it through Hochanda some time last year.

Saturday, 27 June 2020

Playing with Stash


I decided to raid my MDF stash in my Craft Den, and came across these two items, that I bought last year (or maybe the year before), and spent a relaxing afternoon painting them in the sunshine.   They are in two parts - a plain back and then the cut shape.    The back pieces were painted with black acrylic with a sponge.   The cut out shapes had white gesso applied with a sponge first, and then they were painted with Decoart paints - mainly using the neon colours.


Friday, 26 June 2020


The blue box is now complete, and the resin coated flowers added.   Views of all four sides and the inside.


Thursday, 25 June 2020

Large Resin Green Lady


I poured my large green lady the other day.    Really pleased with her.   Even managed to incorporate a hanger for her.    She is about 4 inches square.    Can't wait to try another one with some different coloured flowers.  She glistens so much in the sunlight.

Here is comparison between the smaller one and the larger one.


Wednesday, 24 June 2020

Finished Sea Theme Box

Top

Front

Side 1

Back

Other side

Inside
The finished article was painted with acrylic wax and highlighted with pink and blue gleams.

Tuesday, 23 June 2020

Small Resin Green Lady


A resin Green Lady today - she is about 4" square.    Although I used similar pigments to the dragonfly she has come out with more of a matt finish, and looks metallic.

Monday, 22 June 2020

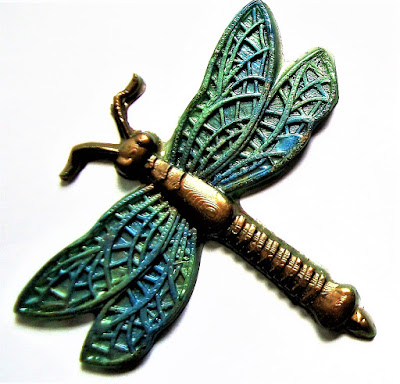
Resin Dragonfly


My first resin Dragonfly - it shimmers so much in the sunlight, which the photo doesn't do justice to.
I was tempted to shape the wings before it hardened too much - but wasn't quick enough today,     I shall make another one.

The mould was brushed with pigment powders and then a green resin was used to fill the mould.

Sunday, 21 June 2020

Doodling Humming Birds


Quite pleased with the finished result.    Even though it was hard to see the smaller details like the chest feather detail, but I got there.   I did cheat a do the background with my black micron brush pen.

Here are a couple more photos of work in progress:


First DAy


Second Day - Fuschias
I also did the background after I did the fuschias, as I decided it was better for my eyesight to see the difference between black and white, before attempting the birds.

Saturday, 20 June 2020

Attempting a Van Gogh in Acrylics


Today I did a paint along on Facebook again with the "Cheese and Wine Painting Club".    A very fast paint along lasting an hour and a quarter.

Not sure that painting in acrylics is my "thing";   although I love my folk art painting.    This was very fast though and I am sure Van Gogh took a lot more time!

I would like to try it again in my own time, taking a little longer, and perhaps tackling it in a slightly different way.

This was the picture that we had as reference and inspiration:


Friday, 19 June 2020

Bird Table Birthday Card


I nearly forgot my neighbour's birthday the other day, so it had to be a quick card.   I knew it was this month, but the days are just a blur these days in lockdown.

She loves her garden and has a bird table near her window - so I used the same stamp as the other day, adding a couple more birds. and used the same embossing technique but added a different background

Thursday, 18 June 2020

A variation on the Windmill Doodle


Following on from yesterday post ....... 

...... When I first knew we were going to draw windmills, I was tempted to do it in blue, inspired by my piece of Delftware.    However, my blue micron pen was much thicker than the ones we were using, and I chickened out and carried on with the black ones.   However, I had done a rough sketch of the windmill when we first started that I didn't like, and where I messed up when I was practising the rope border - thankfully I hadn't chucked it in the bin, so I decided to play with that and outline in blue and add the shading with blue pencil.

I think at some point I will do another windmill picture and this time do the whole thing in blue properly.


my inspiration


Wednesday, 17 June 2020

Doodling - Amsterdam continued

Where does the time go?   ..........


..... I suddenly realised I hadn't posted my finished doodle from Amsterdam week.  As you can see we added a street scene and some figures.   (Little carrot figures).   As I struggle to draw small enough to do more buttons, I found an image of a dutch girl that I adapted to fit in the corner.  (Of course I had finished the rope border and the house in pencil for that area - so there was a bit of rubbing out to do to accommodate her.  I also couldn't face doing another rope border between the images, so I opted for a vine of leaves.

The colouring of the houses looks a bit iffy in the photo - but in real life is much smoother!

Wednesday, 10 June 2020

Sympathy Cards


I had two sympathy cards to make this week - one for the wife of my mum's cousin.   The last of that generation - I am now one of the oldest generation of the family living - but not the oldest.   The other was for a long standing friend.   We have been friends since our teens, and we both got married on the same day.  (A standing joke between us as I got the slot at the village church that she wanted, so she got married in a different church).   We lost touch and now she lives in the next road to me.   I shall think of her later this year too, when we both would have been celebrating our golden weddings.


As you can see the the two cards are similar.  I wanted to keep them simple but a little bit cheerful in these difficult times.   The inspiration came from my new Clarity Club die that arrived on Monday.  The aperture has a section of one of the Clarity paper pads behind it.

Tuesday, 9 June 2020

This week's doodle - Amsterdam - Day 1


We are off to Holland with our new doodle this week.    I struggled a bit with this one - this was my second pencilled attempt.  I really am not good with drawing the fine details with my dodgy eyesight.   The windmill was slightly larger than the original one, because of this so the sails have protruded over the rope border - but no matter it makes it a bit different.    Tomorrow we will "pen" it.   I may leave this bit for a while as I want to see what else we will be drawing, as I fancy searching out my blue fine liner, and doing it in "Delft" style.   Hope the pen doesn't run out if I opt for this choice.

Monday, 8 June 2020

Stamped Birthday Card


Birthday card today using a technique demonstrated by Barbara Gray.     The image (Clarity Stamp)  was stamped with a WOW! embossing pad, and then clear embossing powder applied.   The card stock was masked with masking tape and then yellow, blue and red Artistry inks were applied with an applicator.   The inks were then gently wiped away from the stamped image, and the masking tape removed

Saturday, 6 June 2020

This Week's Doodling/Colouring


This week we have been learning to colour Mandarin Ducks.    These were actually quite difficult, and I do't think I was in the right frame of mind to colour this week - and it shows!   I persevered however. but am not happy with it!  ce la vie, as they say!

It's back to doodling next week.

Friday, 5 June 2020

My First Acrylic Panting


Today I painted along with a Facebook like given by "The Cheese and Wine Painting Club"  .  It was about and hour and a quarter of fast painting in acrylic, and we attempted to produce Monet's Footbridge in acrylic paint.

Yes I use acrylics, and yes I have tried watercolour painting, but have never tried painting in acrylics on canvas.

This painting was my nemesis at school.  I can remember having to paint this using the old powder paints housed in an old bun time!  (Who is old enough to remember that?)  I think it was reproducing the painting that decided whether we were good enough to continue with art - needless to say I failed miserably.

So ...... although it is by no means perfect ....... you can recognise what it is meant to be, and "ya boo sucks" to my old teacher - I can now draw and paint!  If only she had been able to teach us the techniques that I am learning now.

Thursday, 4 June 2020

Green Man in Resin


Well I plucked up courage and decided to pour my large green man mould.   To say I am chuffed with it is an understatement. 

I brush the mould with various coloured pigment powders and then mixed some green resin.  As the mould is so deep I did it in two layers; adding the second layer when the first had started to set, and made the second layer a slightly different shade of green.

I took a few pictures to try and capture the sparkle in him.  He is about 8.1/2" tall and about 6" at his widest width:


I have just ordered his wife, and also another smaller size of him and his wife so watch this space!

Monday, 1 June 2020

Under the sea box

the start of the underwater scene


I built some MDF boxes and  having seen an underwater theme demonstrated on a different sort of box, and having some sea creature elements in my stash, it seemed the obvious choice.   I applied some blue/green pebeo Dyna paint along thee bottom in a rough wave shape, and added Weathered wood crackle paste. I then applied a darker blue over this, and a lighter blue above the line with a sponge, and added some dark and light splodges to this,  again with a sponge.  Using a stencil I created the bubbles.


finished box
Then it was a chance to play - painting up the various elements and adding some more stencilled images.   I gave the elements a light coating of gesso with a sponge first.

another view
I have still got to decide whether to add some more elements to the box, and perhaps a few more stencilled details to the other two sides.