Going Green Blog Background

Monday, 29 July 2019


A simple joint birthday cake for my son-in-law and myself, as we are having a family tea, and our birthdays are next door to each other on the calendar.  As my birthday is a bit of a milestone, we had to have cake and my son-in-law loves my rich fruit cakes (well so do I).  If nobody else wants any, we will be quite happy with that - it will be half each!  I must admit my fruit cakes have quite a reputation, and I have had many compliments in the past from chefs, but only the immediate family know the secret!

We both love royal-iced cakes too, but as I had hurt my back (see an earlier post) I couldn't stand to do the icing as it takes a few days, albeit only a few minutes each day, so for once I cheated and used sugarpaste.

We both love sweet peas, so I chose those for the spray on the top, colouring them the same as some I have growing in the garden.

Obviously I couldn't make the cake too feminine, so I discovered a train stencil in my cake stash, and my son-in-law collects model trains, so I stencilled it on to a strip of sugarpaste and attached it to the front of the cake, using the same range of purple colours that I used in the flowers.   To finish the sides of the cake I did scallops of little blossoms.

side front view

a glimpse of one of the scallops around the rest of the side of the cake


Sunday, 28 July 2019

Quick gift card


To go with the huge card from yesterday - a little card to contain the gift of some money.  I can't remember who manufactured the set of stamps - apologies!

Just stamped in Nuvo black, and then watercoloured.  I can see that my eyes are getting worse, but fortunately with water colouring it doesn't matter too much.

Saturday, 27 July 2019


I tweaked the painting on this image that I shared the other day.   I wanted to make a card from it, but the handmade rag paper was A5 size and I didn't want to trim the natural edge to it, so I had to create an A4 card.   Thank goodness for washi tape!.  It worked to join the two bits of cardstock and I used some more to create a frame around the front of the card.

(In hindsight, I think I have some A3 card somewhere, but I will blame it on the heat this week that I didn't even think of that!  Added to which I have been suffering from a very painful back following a collision with a wall in the house, where the wall won!)

I didn't add any sentiment to the card, so it could be mounted in a frame later.

Friday, 26 July 2019

Penguin Card


A card made for a family member who is mad about penguins.   Created in Craft Artist.   He was originally a Christmas penguin, but with a bit of tweaking and adding a hat and changing his bow, he is an anytime penguin!

The edges of the image were distressed with ink, and using the same ink and a stamp the edges of the card were also stamped

Sunday, 21 July 2019

Watercolured Goblin


I haven't done much  crafting this week, due to having a slight argument with a wall!  My own fault, I slipped thinking I had reached the bottom of the stairs, and I hadn't - ended up head butting the wall (fortunately a hard head and didn't hurt that), but the abrupt coming to a stop whilst falling has given me a sort of whiplash in my back, and to say I am in agony would be an understatement.  I am finding it hard to bend over my work, or even sit for any length of time.  I hope it gets better soon, but we all know these things take time!  I also have a birthday cake to ice and decorate for my upcoming birthday!

Anyway I did manage to sit quietly in the sun the other day and paint this Pink Ink designed I stamped onto handmade cotton paper.   (The paper is beautiful to work on).   I want to try and stamp this on to fabric, so this was a little experiment on the paper first.


Tuesday, 16 July 2019

Russian Dolls


Aren't these cute?  Had great fun painting these.  (Even if the old eyes had a little problem with some of the intricate bits)

This was how they arrived:


A bit like painting by numbers.  I painted them in the traditional colours, and followed the idea given in the instruction.


I have always wanted a set of these dolls.   I could get addicted to painting them.  ( I have seen some online that are completely plain, and have some great ideas of how they could be painted.)

(The company also sells dolls that can be painted as animals - I bought a set of penguin ones for a young family member for their birthday)

Monday, 15 July 2019

Finished Piano


Here is the finished piano, complete with its flower arrangement.   The flowers are made from air dry clay - mainly using FMM paste, but also a little Hearty Clay.   I made the roses and leaves in white paste and then dusted them with cake decorating powder colours.  As I wanted a softer effect instead of making the gypsophila from clay, I used some dried gyp from my stash.  I have had this for over 20 years from my cake decorating days, and although it was in a dark place under the stairs it had aged a tad.  Undaunted as a crafter I dry brush it with a bit of white gesso to bring it back to life.  (I have now ordered more - so I will remake the arrangement in due course).

another view


The flowers and leaves before and after they were dusted


Thursday, 11 July 2019

MDF Piano


I have fallen in love with the littler piano.   I didn't know what colour to paint it - but ended up doing it in a classical style.  I shall make some flowers to go in it and I thought he black would set off the flowers well.


I gave the MDF a coat f of black gesso on the outside and gold gesso on the inside.   I also used the gold gesso on the gold sections and embellishments, with a smidgen of gold gilding wax to give shadows.highlights.

I found an image of the inside frame of a grand piano and printed that off and stuck it to the bottom of the inside - it wasn't quite the right shape, but it was difficult to get it just right.  However, it won't notice when the flowers are inside.

I wanted a music ledge, so I used one of the embellishments and cut it in half lengthwise with a hacksaw, and with a pokey tool (aka a crafter's bradawl) I made a couple of holes and fashioned some retainers with jewellery wire.   I then found an image of a piece of music and reduced it in size, slightly colouring it by brushing some Old Paper Distress Oxide over it.  I then coated it with gel to stiffen it.

another view

The kit is made by Olifantjie.

a glimpse of the inside
I will post another photo when I have made the flowers.   I am thinking at the moment roses and sweet peas.    In fact I could probably make a lot of different flowers and change the arrangement according to the season.


Monday, 8 July 2019

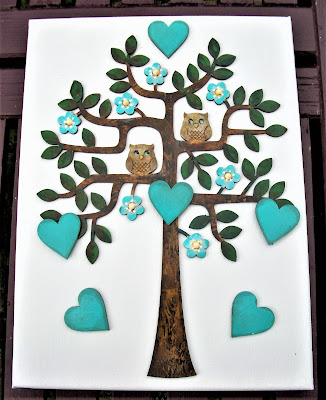
Family tree plaque


My daughter bought this MDF tree back in the Spring from Craftwood Creations, on the proviso that I painted it for her .... I have at last got around to doing it.  It is not entirely finished, as I didn't know what sort of background she wanted, so the canvas is just gessoed for the time being.   Also I didn't know what she wanted on the hearts, or where she wanted them placed, so for the moment nothing is stuck down.   Once she has decided I can finish it ....... or she can finish it herself.

I painted the bark with various shades of brown, and then having been playing with some stamperia creme paste and a tree bark impression mat, I used the "skin/mould" I created with the paste (picture below) as a stamp, and added some bark effect with light brown and darker brown paint.  I am pleased with the result.   The leaves were painted with various shades of green and a smidgen of brown.

I used various colours of paint on the owls until I was happy with them, smudging a lot of the colour on with my finger.  I then did a bit of highlighting with a couple of paint pens again smudging with my finger..   The flowers were painted with a couple of shades of aqua and some yellow added for the centre.  I then applied some Nuvo drops to the centres

The hearts were painted with the darker of the two aqua colours, and then I distressed the edges with a sponge and some grey nuvo inkpad.   I also distressed the edges of parts of the tree and leaves with a sponge and a black ink pad.

Below is the strip I made from the texture mat with the creme paste.  I managed to tear it as I removed it from the mat, but for the purpose that I wanted it for it was fine, and it was a first time experiment using the paste.   You can see how  I used it with paint as a stamp.


Saturday, 6 July 2019

MDF Grand Piano


I have always wanted a grand piano - but think this is the closest I will get - lol!   Work in progress at the moment as I have to decide how I want to paint it, now that I have made it.   Do I go classical black, or white, or cream or some bizarre colour?   I also need to make some flowers to go in it.

I am going to have fund whatever I decide.

The kit was from Olifantjie.

Friday, 5 July 2019

Celtic Tree


I got this Celtic Tree from Button-It and Craftwood Creations (oh they do have some lovely designs - do check them out).  It was great to catch up with them at Farnborough back in the Spring as there was no show last year and I do love their designs.

I have kept this very simple and just did a background with various green and brown acrylic paints, applied with a sponge.

I painted the decoration with black gesso and then rubbed Pebeo gilding wax, and to try and give some shading I used silver and gold.

I am not quite sure what colour to paint the canvas yet - possibly a light blue or a light grey.   I did think of watercolour painting it with blues and greens, but am not sure - I think it needs a plain background.  Decisions, decisions!

The kit in its "raw" state

Thursday, 4 July 2019

A little fun plaque


A little piece of mixed media for this one.  Once again I can't remember where all the bits came from, apart from the fact that I bought them at Farnborough, I do know the sentiment was a SamanthaK one.   The coffee cup was a die from my stash (at this point in time I can't remember who that was from either, and the packaging has gone missing - how do things suddenly disappear off your desk when you have just been using them ?)

The roses were made freehand from Hearty Clay, coloured with a smidgen of food colouring and then brushed with cake decorating dust.  The leaves were done with a cutter, and again coloured and dusted as before.  

The sentiment was glued on the plaque, then the whole thing painted with black gesso, and then overpainted with Pebeo blue/black iridescent paint and finally Pebeo gilding wax in  silver and gold was applied, and the coffee cup, which was cut from Kratt card, had the same applied

Wednesday, 3 July 2019

Mixed Media canvas


Another little play - using up some of my ~MDF stash.  I think this kit was from SamanthaK crafts - to be honest I have had some of my stash for so long I forget where I bought it - but I think this was Sam's that I bought at Farnborough.

I painted the background with water colours, in an attempt to create a countryside scene with sky, sunshine, fields and flowers.

The MDF pieces were painted with acrylic paints

Tuesday, 2 July 2019

Something a bit different


Men's card can be so difficult - well they are for me!    I bought this set of  AALL & CREATE stamps at Farnborough back in the spring as I thought it would be a good one for backgrounds in  journals.  However, I decided to try and use it on a birthday card, as I have a crafting friend who is  into steampunk  etc.  OK it's not exactly steampunk, but I went with it anyway.  I stamped the white cardstock with the larger stamp as a background, and then die-cui a square with the Clarity picot square dies, and stamped the other image onto that and embossed it.  (I used Nuvo Poppy Red for both)  I then used a dauber to go around the edges of the square and card with the same ink pad, and I used some Nuvo Warm Grey which I watered down to paint around the outside of the centre square, with a paintbrush once it was stuck down, to create a shadow.   I used the same Grey with a dauber to go around the edge of the card to tie in the background.   Finally a sentiment in red was cut from red pearlescent  card.

It was a complete experiment and quite out of my normal comfort zone, but I am pleased with the finished result and the faux 3D effect around the central square.

(For info when I made the insert I used the smaller Indigoblu Golden Ratio stamp as well).