Going Green Blog Background

Sunday, 30 September 2018

Haunted House


The light wasn't very good when I took this photo, so hope you can see it clearly enough.   Another of my Halloween Kits - I apologise that I can't remember the name, but there are no labels on the bags, all I can say is that I bought them from Hochanda.

The house is made so that a battery tealight will sit in between the front and the back, so I painted the insides of the two parts of the house with Pebeo Dyna fluorescent orange.   It does look effective with the tealight in it (although this photo is just taken with the flash on the camera. )  

As with the tombstone I used mainly Pebeo paints for this kit.  (Mmainly because I was up the garden in my Den, and all my Pebeo paints were up there and to hand; and as it was so lovely in the sunshine I was too lazy to walk back down to the house for any others!)

I have used the marbline spray again on the house, didn't quite go where I wanted it - but it looks quite effective in real life.  

I still need to work out exactly where the ghost is going to sit and glue him down properly, and I think the bat needs some "eyes".   I will try and take another photo in daylight and add it here.  I do find taking a photo is quite good as you can then see what need improving.

As promised another photo: 


Saturday, 29 September 2018

Back to Halloween


Well the last couple of posts have been "pretty" - so today I am back to ghouls and ghosties, with this littles mdf project.   It was part of a collection of kits I bought, which included this tombstone, and a haunted house and lots of accessories.  It also came with the faux moss.

The main tombstone was sprayed with granite spray and then painted in various shades of grey.  It was then sprayed with silver marbling spray.  oh Wow, am in love with this effect.   

I then painted the various embellishments ( I do want to do a bit more to the pumpkin, he is not shaded enough to my liking at the moment, so a bit of work with some paint or distress inks is required methinks.  I shall also add either some jewels or Nuvo drops to the eyes of the cat, ghost and pumpkin.  I am also thinking I need some red paint of Nuvo drops, dripping down form the RIP. !!!!!! I think I might also put some phosphorescent gel on the white paint.   (Well if I am going to scare the local kids .... I might as well make a good job of it!)

At least my bad closework eyesight paid of when I wrote the Happy Halloween - I purposely did it shaky writing - lol!

Friday, 28 September 2018

Writing Slope Project


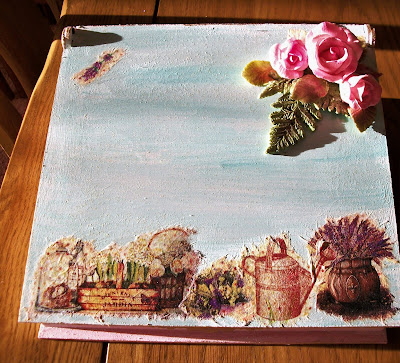
Along with the hanging planks, I have been working on this little project over the past couple of days, and must admit I am pretty pleased with it, albeit the photo doesn't really do it justice as it was the wrong time of day to take a photo really.
.


It started off like this - painted with Crystal Glitter Antique White Glitter Chalk Furniture paint, mixed with Luscious Powders - Mermaid Tresses for the top and inside, Unicron Dreams for the sides, and a smidgen of Penny Dreadful for the escutcheon  (ooo get me I remembered the right word!).


I then added some decoupage with 13@rts multi-purpose gel medium, and then did a coat of the medium all over and inside the slope.

 
with decoupage


I then made some roses and leaves from FMM air dry clay.   It's a while since I made roses properly, normally for clay work I make what I call Marzipan roses - i.e. freehand with no cutters.   However today I used a cutter and Nick Lodge/Katy Sue silicone moulds and mats.  (Am a bit rusty, and my dusting needs brushing up on - pun not intended - another time I will colour the clay first!)

one of the roses


Finished spray of roses, rose leaves and fern.

I also added some spray granite to the sides, and a little gilding wax to the escutcheon.

granikte spray

....and finally another view in a different light:


Thursday, 27 September 2018

Hanging Wooden Plank Decoration

Background prep showing marbling spray


I have had this wooden plank decoration hanging around for a few weeks now - It had been built and gessoed but what did I want to do with it?

The original idea was to do some folk art on it. Yesterday was the day I made a decision.  I painted it with Antique White Crystal Glitter Chalk Furniture Paint to which I added some Green Luscious Powder.   I then got out my cans of marbling spray and crackle sprays.  The white crackle spray didn't seem to show up that well ( need to practise again)- but the silver marbling was fantastic.  I will be using that again.


Today I decided to try out a stencil on it.    Initially the idea was to use texture paste and then paint over it - erm - well I got it wrong and the jar I picked up turned out to be clear!  duh!   Undaunted I tried again, carefully repositioning the stencil, and carefully stencilling this time, rather than using a palette knife, with Imagination Crafts Shabby Chic relief paste in Ashy Rose, Sage and Linen colours.
This was relatively successful - I did miss a couple of bits, but touched those up with a paintbrush.  I then went around the edge of the panks with the same relief paste in the rose colour with a sponge.

I took another picture this evening indoors as the piece was sitting on the dining table and the sun was highlighting the relief paste, and showing the dimension better.


Showing the dimension of the relieff paste.
(and more realistic colours)


Monday, 24 September 2018

Playing with egg shells ......

close of one section

............. What the heck is she up to now you ask?


Does this clue help?

 OK ... I will put you out for your misery.    Having boiled some eggs, I took off the shells, gave them a wash and then put them in the oven to "cook" for about 15 minutes to remove the inner membrane.  I then applied some That's Craft Clear 3D Gloss Gel Medium to the drawers of an MDF project I had made, and stuck on the bits of shell, adding more gel medium as I went along.   I then applied another coat of the medium when all bits were stuck on.

A quick heat with a heat gun to set the gel, and then I overpainted the drawers with White Gesso, to which I had added some Brushos, to create my own chalk paint.  One had purple added and one blue.  When dry I had an idea that rather than spray with varnish I would try an experiment and add some Brushos (using same colours) to some Rustoleum Furniture Finishing Wax, which I applied with my finger.  I then buffed it with a clean cloth.   Result! 

I painted the inside of he drawers with Crystal Glitter Antique White Glitter paint, and applied the Finishing Wax to those too.  Finally I added a couple of little silk flowers to create handles.
 

Inside of Drawers

Hope you can see the sparkle.
The outside of the unit was also painted with the Antique White Crystal Glitter paint, with the addition of scarlet Brushos!   I didn't mix the colour in completely, so I got a random streak look to it.   Again finished with Wax.

Finished Unit.
 
I also had another divided unit that complemented the drawers, which again was painted with White Gesso mixed with Brushos.  The two divided units were painted the same colours as the drawer fronts, and leaf green was added for the outside of the unit.  Again finished with the furniture wax.
Once again a streaky effect to the inside.
Finally the completed units together:   (The colours are actually paler and more delicate than in the photos, but due to the rainy day photos had to be taken indoors!)

Complete unit with drawers (which are opposite colours to the top)
I want to do some sort of decoration on the green part, but I haven't yet decided what. ..... maybe a stencilled pattern, maybe some stamping, or maybe some folk art.  There is no rush.  I will finish it as and when the mood/inspiration strikes.   I want to keep it pastel and pretty.  In the meantime it looks very smart sitting on my desk, keeping some stamps and stencils neat and tidy, with some small odds and ends in the drawers that always seem to go missing - like my bone folders for starters!


Saturday, 22 September 2018

More Spooky - Work In Progress


I have been a bit busy with lots of work in progress when I have had the chance. (Why does life get in the way of crafting?  but I suppose we have to do housework and gardening etc.  !)

However, I thought I would share a sneaky peak of work in progress of this project, which is a book box, just in case you thought I was ignoring my blog.

More later as I get around to finishing the outside (and the inside).

Thursday, 20 September 2018

Parchment and Die Birthday Card.


I suddenly realised I need a birthday card for the weekend.   I already had this die cut image in my stash, so I used the new picot edge square dies from Clarity and cut a piece of Clarity  parchment to go behind it.   I decided to make it slightly bigger, and then used the matching groovy plate to emboss some lines around the edge.   Having stuck the backing paper and the image on the card, I then got my mapping pen and Pergamano Sticky Ink, and highlighted a few places, and then sprinkled som Perga-Glitter over.   ( I think you can just about see the hints of glitter on the card)

Wednesday, 19 September 2018

Spooky!


This MDF skeleton arrived yesterday, and I confess I just had to start painting him.  Basically just white gesso lightly all over him.  Then I went over some of the outlines with a pencil to create some shade rubbing it with my finger.  I then overpainted the bones with white acrylic paint, and added more shading with a a little black added to the white.   I then went over him with Pebeo Phosphorescent gel.

I may need to do some more to him regarding shading, and possibly adding some more of the gel  when my eyes are better to enhance the detail, as I really want him to glow in the dark;  but I have plenty of time before Halloween.

As you can see he is quite tall - so finding somewhere to take a photo was difficult - so he got hung up on a branch of my pyracantha !

Monday, 17 September 2018

A Little Bird Told Me ..


Today it is a simple little card for a man (don't we hate those)  I was struggling to come up with an idea, and then the postie delivered some mail with this lovely little die from Tonic in it (which was free with an order!)  Result - just what I needed.

I cut it out of black card, also using one of my Clarity picot dies around it      I could have chosen not to use the picot die and just cut the image out of the centre of the card.   (It also comes with it's own surround to make a hanging bauble tag sort of thing.) 

I also cut a circle from Clarity Designer paper (Rainbow River) to back the image.

As my eyes are still not that good following my cataract op  (distance is fine, but still have problems with close work until I get me new glasses) I used a square die to align the pencil lines I wanted to draw in the corner (I know even so they are a bit wobbly as I couldn't actually see the corner of the die - duh! .... but you get the gist of the idea to make life simpler.

Keeping the front of the card simple, I just made an insert in Craft Artist to continue the sentiment, and created some matching corners, and added a picture of aircraft in greyscale to complete, as the recipient loves aircraft.


Sunday, 16 September 2018

Space Project


Today I am sharing one of my 6 year old granddaughter's effort - her space project for school.   She came up with the idea of what she wanted to do - and her father came up with a way of illuminating it.

This was nearly all her own work.   She made the planets from Hearty Air Dry Clay, and painted them with watercolours following a chart from the internet.  Making them as as realistic in size as she could - though Jupiter and Saturn should be a lot larger in comparison, but had to be realistic with the size of box she was working in (one from her own shoes).  She threaded the planets on some black fishing line (courtesy of a friend of her mother).  She painted the shoe box with black sparkly paint  for the night sky and added a few drops of glue and some and some glitter for even more stars. 

The sun was created from some old packaging, which she paint with clear gesso and alcohol inks.


She needed a little help creating the holder for the torch, which was created from some more packaging; and she needed a little help from her cousin and me to wield the hot glue gun to stick it to the box ..... and to cut the hole in the box with a stanley knife. For safety reasons, I think that is allowed.  (The torch shines through the side of the box and the sun.

Note the rings on Saturn - created by cutting out the shape in clay with two bottle tops!  Also the Earth has its moon (confess an inspiration of mine in the middle of the night to use a map pin - and her aunt came to the rescue with one!)

I hope you agree that she had made a brilliant job of it.

Friday, 14 September 2018

Small Trinket Box


box and lid

another view with lid resting on top of box

I introduced you to a couple of Windsor Trinket boxes the other week, as work in progress: and I have now finished painting the half windsor - a lovely little twelve-sided box.   (The maker is Candy Box Crafts and it is first time I have made up one of their items.  Instructions are very basic but easy to follow.  The lid design makes for a perfect fit).

The detail on the side is created by stamping on black card with a John-next-door stamp with Nuvo clear, and then embossing with Cosmic Shimmer True White embossing powder.   The rest of the box was painted with Hobbycraft Mars Black acrylic paint, with Titanium White for the handle.  (I had originally planned to painted the box gold and use gold embossing powder, but I didn't like any of my gold powders, so, I decided to go with a faux black and white wedgewood look.

I am now trying to decide whether to do the large box in the same style or go with a different colour with painted detail on it.  I am leaning toward the latter.

Thursday, 13 September 2018

Introducing MDF Tim - Spaceman


My latest project is complete -  MDF Tim Peake (as requested by my daughter).

view of one arm

view of second arm

back


sitting

I had a guide from a picture of a lego Tim, and also some pictures of Tim's space suit.   I had an inspiration for his hair - I modelled it using FMM Air Dry Clay - this proved a brilliant idea, as it can be removed.    When dry the hair was painted with various shades of brown, etc.

Work in  Progress - Face added with Posca Pens


I used Craft Artist to design his "clothes"  - taking the badges in and re-sizing them.  I created some zips.  I also took his name badge from his space suit, and then redrew it using a couple of elements from the real one (i.e. clasps etc.)  Having checked sizes by printing on copy paper and adjusting as necessary, I had intended to print them on rice paper, but my printer didn't want to play .... and then by chance I found some printable clear adhesive sheets in my stash - Result!

Picture of Tim's space suit for comparison.


If you would like to build and paint your own MDF brick man - you can find him (or her if you want to paint it as a girl) at Clevercut.co.uk.


Wednesday, 12 September 2018

MDF Train


I gave you a sneak peak of this the other week - now it is finished.  I must say I am pretty pleased with it.   I hope the recipient will be - but shan't know for a while as it is part of his Christmas pressie!


writing done with Posca pens


I thought I would share a few work in progress shots.

before painting and after having powertex applied

achieving the wood grain effect

The colours used for the woodgrain ....

...... and how the colours were splodged on before brushing out to achieve the wood effect.

Tuesday, 11 September 2018

More Goodies to be played with


Look what arrived last Friday .... yes I know I have loads of cake decorating bit - but wanted these to use with Air Dry Clay for my mixed media items.

Monday, 10 September 2018

Trinket Box


Another work in progress -  I love the shape of these boxes.   I had already built the smaller one, and applied gesso.


So I have as you will see if you follow me regularly I have something to keep me occupied for a few weeks! 

I also hope to have some MDF Robots to build in the very near future, as well as a couple of tractors and a traction engine!